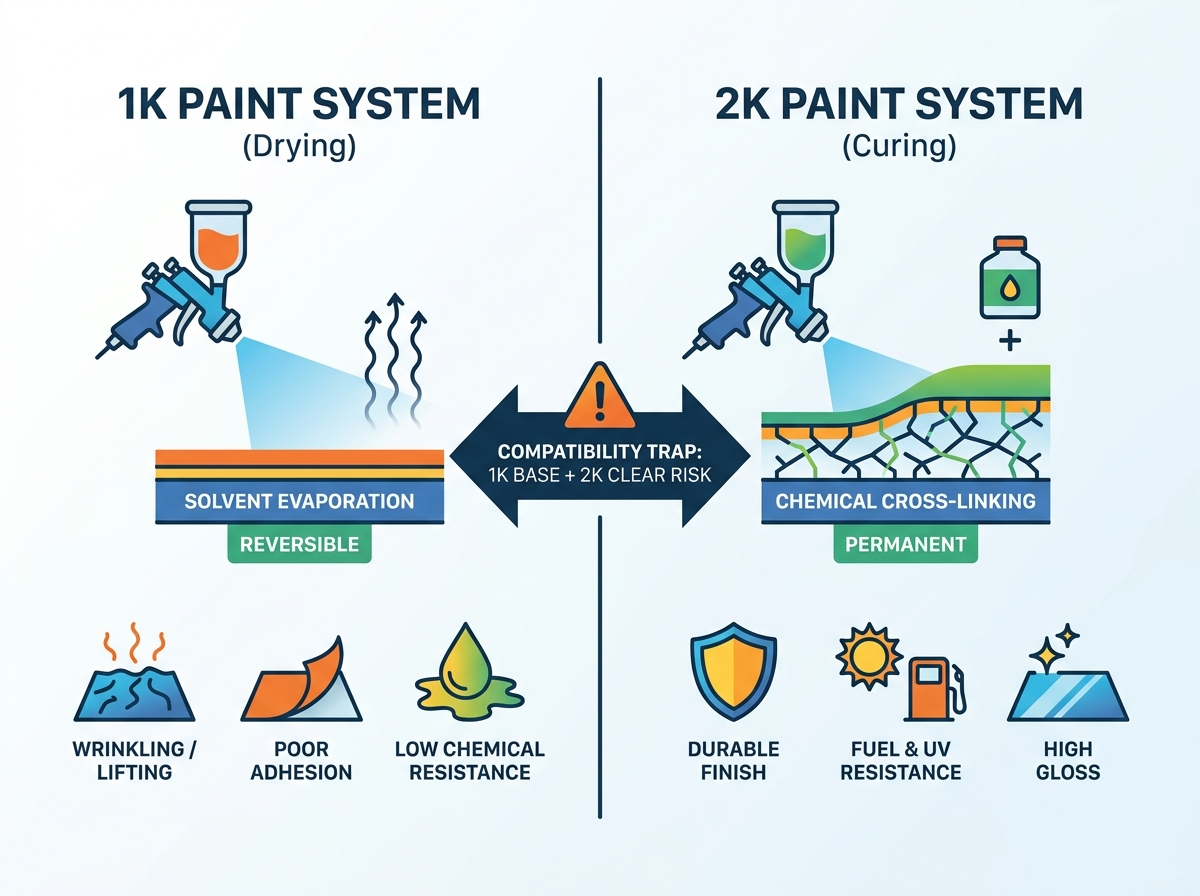
Single-component paints deliver exceptional convenience for quick touch-ups and specific spot applications. They eliminate messy mixing ratios and save valuable prep time. However, this ease of use introduces a significant tradeoff. Users frequently face challenges regarding long-term durability and finish stability.
Most single-component paint failures stem from misaligned expectations, poor surface preparation, or a basic misunderstanding of the curing process. When you apply a coating without fully respecting its chemical boundaries, defects happen quickly. The resulting rework consumes both time and resources.
Our goal is to provide you an evidence-based troubleshooting framework. You will learn to diagnose current paint issues accurately. We will help you understand specific product limitations and environmental requirements. Ultimately, you can make an informed decision on whether to proceed using your current materials or upgrade to a catalyzed system for better durability.
Key Takeaways
- Drying vs. Curing: 1K color paint dries via solvent evaporation, not chemical cross-linking, making it inherently more vulnerable to solvents and harsh environments.
- Compatibility Risks: Mixing 1K base coats with incompatible clear coats frequently causes wrinkling, lifting, and adhesion failure.
- Proper Evaluation: Choosing between 1K and 2K requires matching exact 1k color paint specifications against project requirements (e.g., fuel resistance, UV exposure, physical wear).
- Prevention First: 80% of 1K paint defects can be solved through strict climate control and rigorous surface preparation.
Understanding 1K Color Paint Specifications and Baseline Limitations
To master any automotive or industrial finish, we must first understand its fundamental chemistry. A 1K, or single-component, paint requires no chemical hardener. It relies entirely on physical drying. As the carrier solvents evaporate into the air, the solid resins and pigments remain on the surface. This evaporation leaves behind a solid film.
Because no chemical cross-linking occurs, the final film remains chemically open. We call this a thermoplastic state. You can essentially melt the paint again by introducing strong solvents later. This reversibility creates a massive risk factor when you apply topcoats or expose the surface to harsh cleaners.
When reviewing 1k color paint specifications, you must align the material limits with your project demands. Ignoring the technical data sheet (TDS) inevitably leads to coating failure.
- Solvent Resistance: Low to moderate. These finishes remain highly susceptible to gasoline spills, brake fluid, and aggressive degreasers.
- Build and Fill: Lower film thickness per coat compared to catalyzed paints. Attempting to build thickness too fast traps solvents.
- Reversibility: The paint reactivates easily. Spraying a "hot" solvent-heavy topcoat directly over it will cause the base to swell and lift.
You can achieve perfect success with single-component products, provided you use them within their intended scope. Excellent use cases include interior plastic trims, hidden door jambs, small spot repairs, and non-structural cosmetic fixes. If the part faces heavy physical wear or chemical exposure, single-component bases quickly reach their limits.
![1K color paint application and troubleshooting]()
Diagnosing and Troubleshooting Common 1K Paint Failures
Even experienced technicians encounter defects. Recognizing the visual cues of a failure helps you trace the problem back to its root cause. Let us examine the most common issues you will face in the booth or garage.
Wrinkling and Lifting (The "Alligator" Effect)
Wrinkling looks exactly like alligator skin. The surface shrivels into a series of tight ridges. The root cause usually involves applying heavy coats too quickly. It also occurs when incompatible solvents from a new topcoat attack the reversible layer underneath.
The solution requires patience. You must allow complete flash-off times between coats. If wrinkling already occurred, you cannot simply paint over it. Sand the defect back to a stable, cured substrate. Then, apply light, mist coats to seal the area gently without shocking the underlying film.
Slow Drying or Soft Paint
Sometimes the finish remains soft or tacky for days. The root cause heavily links to high ambient humidity or low temperatures. Excessively thick application also prevents solvents from escaping. The top layer skins over, effectively trapping wet solvents underneath.
To fix this, you must introduce infrared (IR) heat curing lamps. Enforce strict climate-controlled application environments. Most importantly, strictly adhere to the film build limits detailed in your product's TDS. Heat helps drive the trapped solvents out, though severe cases may require stripping and repainting.
Poor Adhesion (Peeling/Flaking)
Flaking paint indicates a failed bond. The root cause usually points to inadequate mechanical preparation, such as using the wrong grit sandpaper. It can also stem from chemical contamination like residual wax, silicone, or finger grease.
Implement a strict solvent-wipe protocol using a dedicated wax and grease remover. Ensure you scuff the surface properly before primer or color application. Mechanical tooth is non-negotiable for physical adhesion.
Defect Troubleshooting Matrix
| Visible Defect | Primary Root Cause | Immediate Solution |
| Alligator Wrinkling | Trapped solvents or solvent-shock from heavy topcoats. | Sand to stable base; apply dry mist coats to seal. |
| Soft / Tacky Finish | High humidity, low temp, or excessively thick layers. | Use IR lamps; ensure climate control; respect TDS limits. |
| Flaking / Peeling | Poor mechanical scuffing or surface contamination. | Strip area; use wax/grease remover; use correct grit paper. |
The Compatibility Trap: 1K Clear Coat vs 2K
Users frequently debate how to seal their fresh color base. The decision between clear coat types dictates the final durability of your project. Choosing poorly here ruins an otherwise perfect base application.
1K Clear Coat Options
Single-component clears offer unmatched simplicity. They feature no pot life, meaning the product will not harden inside your spray gun or aerosol can. They provide ease of use and a much lower initial cost.
However, the cons are significant. They lack chemical cross-linking. Therefore, they remain prone to dulling under harsh UV exposure. They scratch easily and offer almost zero resistance to fuel or harsh chemicals.
2K Clear Coat (Isocyanate-Catalyzed)
Catalyzed clear coats utilize a chemical hardener. This creates true chemical cross-linking. The pros include superior fuel and chemical resistance, outstanding UV protection, and high gloss retention over many years.
The cons revolve around safety and workflow. They require serious personal protective equipment (PPE), including a proper respirator. They impose a strict pot life; once mixed, you must use it or lose it. They also cost more upfront.
The Final Verdict
When analyzing 1k clear coat vs 2k, we strongly recommend catalyzed clears over single-component bases for demanding projects. Any exterior automotive panel, motorcycle gas tank, or high-wear industrial surface requires a catalyzed topcoat.
To apply a catalyzed topcoat safely over a reversible base, you must modify your technique. The solvents in the catalyzed clear can easily melt the base beneath it. Apply a very light dust coat first. Let it flash completely. This creates a protective barrier. Follow up with a slightly heavier tack coat, and finally, your wet coats.
Implementation Risks: SOPs for Flawless 1K Application
Standard Operating Procedures (SOPs) separate amateur results from professional finishes. You must control pre-application variables tightly to guarantee success.
Pre-Application Variables
Reading the Technical Data Sheet (TDS) is mandatory. It contains the exact temperature and ambient humidity thresholds for your specific material. Spraying outside these parameters guarantees a defect. Always measure surface temperature, not just air temperature. Cold metal panels will cause solvents to condense rather than evaporate.
Flash-Off Management
Rushing between coats destroys more paint jobs than poor technique. You must allow each layer to outgas properly. We use practical tests to verify readiness.
- The String Test: Touch the masking tape adjacent to your repair area. As you pull your gloved finger away, look for strings of paint. If it strings, the paint remains too wet.
- The Touch Test: The paint on the tape should feel tacky but should not transfer onto your glove. Once it reaches this state, you may apply the next layer.
Tool and Equipment Realities
Your application method dictates the final film quality. Aerosol applications suffer from low pressure and poor atomization. They spit blobs of material if the nozzle clogs or the can gets too cold. Always warm aerosol cans in a bucket of warm water before spraying to increase internal pressure.
HVLP (High Volume Low Pressure) spray guns offer far superior control. However, they require careful nozzle maintenance. You must select the correct fluid tip size based on the TDS recommendations. An oversized tip dumps too much material, trapping solvents instantly.
Common Mistakes to Avoid
- Skipping the wax and grease remover step before sanding.
- Spraying heavy wet coats immediately to achieve gloss.
- Ignoring the recommended flash times listed in the TDS.
- Failing to wear appropriate PPE, even with non-catalyzed materials.
Decision Matrix: Shortlisting Your Next Steps
Knowing when to deploy a specific chemical system saves time and money. You must audit your environment and project needs honestly.
When to Stick with Single-Component Systems
You should stick with non-catalyzed materials for interior trims and dashboard plastics. Engine bay accents work well if the material features a high-temp rating. Temporary cosmetic fixes on older vehicles also make sense. Finally, if you lack the proper supplied-air respirator and ventilation systems for highly toxic isocyanates, stay with non-catalyzed materials for safety.
When to Pivot to a 2K System
You must upgrade to a catalyzed system for full exterior panel resprays. Any area exposed to gasoline, like a motorcycle tank or filler neck, demands cross-linked protection. Commercial fleets, heavy equipment, and long-term restoration projects require the structural durability that only a catalyzed system provides.
Next Action Steps
Audit your current project environment. Measure your temperature and humidity. Assess the exact chemical exposure risk of the painted part. Will it see fuel spills? Will it bake in the sun daily? Once you answer these questions, source all your materials from a single manufacturer. Staying within one brand's ecosystem helps guarantee chemical compatibility. Whether you buy primer or topcoats, ensuring your 1K color paint matches the topcoat chemistry is the single best way to prevent failure.
Conclusion
Single-component paint is not inherently flawed. Instead, application errors and mismatched user expectations drive the high failure rate. When you understand the physical evaporation process, you can prevent wrinkles, lifting, and soft finishes easily.
While these materials provide unmatched convenience for specific spot repairs, you must respect their limits. Structural durability requires honoring flash-off times strictly. In high-wear or chemically harsh scenarios, you must rely on a catalyzed topcoat to protect your base layers.
Before you begin your next phase, consult the product-specific TDS documents. Reach out to a technical supplier to verify compatibility across your primers, bases, and clear coats. Preparation in the planning stage prevents endless sanding in the booth.
FAQ
Q: Can you spray 2K clear coat over 1K color paint?
A: Yes, but with strict caveats. The 1K base must be fully flashed off and outgassed. The first 2K clear coat must be a very light "tack coat" to avoid solvent-shocking and lifting the 1K base.
Q: Why is my 1K paint still soft after 48 hours?
A: Likely due to solvent entrapment from applying coats too thickly or spraying in cold/humid conditions. 1K paint dries from the outside in; a "skinned" top layer can trap wet solvents underneath indefinitely.
Q: Is 1K paint fuel resistant?
A: No. Because it dries via evaporation without a chemical hardener, spills of gasoline, brake fluid, or harsh thinners will reactivate and melt the paint.