Auto body work demands serious dedication, physical effort, and financial capital. You pour countless hours into sanding, filling, and masking prep. However, the final finish chemistry ultimately determines the success of your entire project. Choosing the wrong coatings can quickly ruin a meticulously prepared restoration. Inferior materials often lead to premature peeling, aggressive chemical damage, or a frustrating complete project restart. This comprehensive guide breaks down the professional standard of 2K car paint to help you achieve truly flawless, lasting results. We will explore the fascinating underlying chemistry and detail the strict implementation requirements needed for a glass-like finish. Furthermore, we will outline the non-negotiable safety protocols you absolutely must follow. You will learn exactly how to evaluate, mix, and apply these advanced coatings successfully in your own workspace.
Key Takeaways
- Chemistry over evaporation: 2K paint cures via a chemical reaction (resin + hardener), making it vastly superior to 1K (evaporative) paints in durability and chemical resistance.
- Strict time limits: Once mixed, 2K paint has a limited "pot life"—it must be sprayed before it hardens in the gun.
- Severe health risks: 2K paints contain isocyanates, requiring specialized, high-level respiratory and skin protection beyond standard masks.
- Project scope dictates choice: 2K is mandatory for clear coats and full panel restorations, while 1K is only suitable for minor, temporary cosmetic touch-ups.
1. Demystifying 2K Car Paint: The Chemistry of Curing vs. Drying
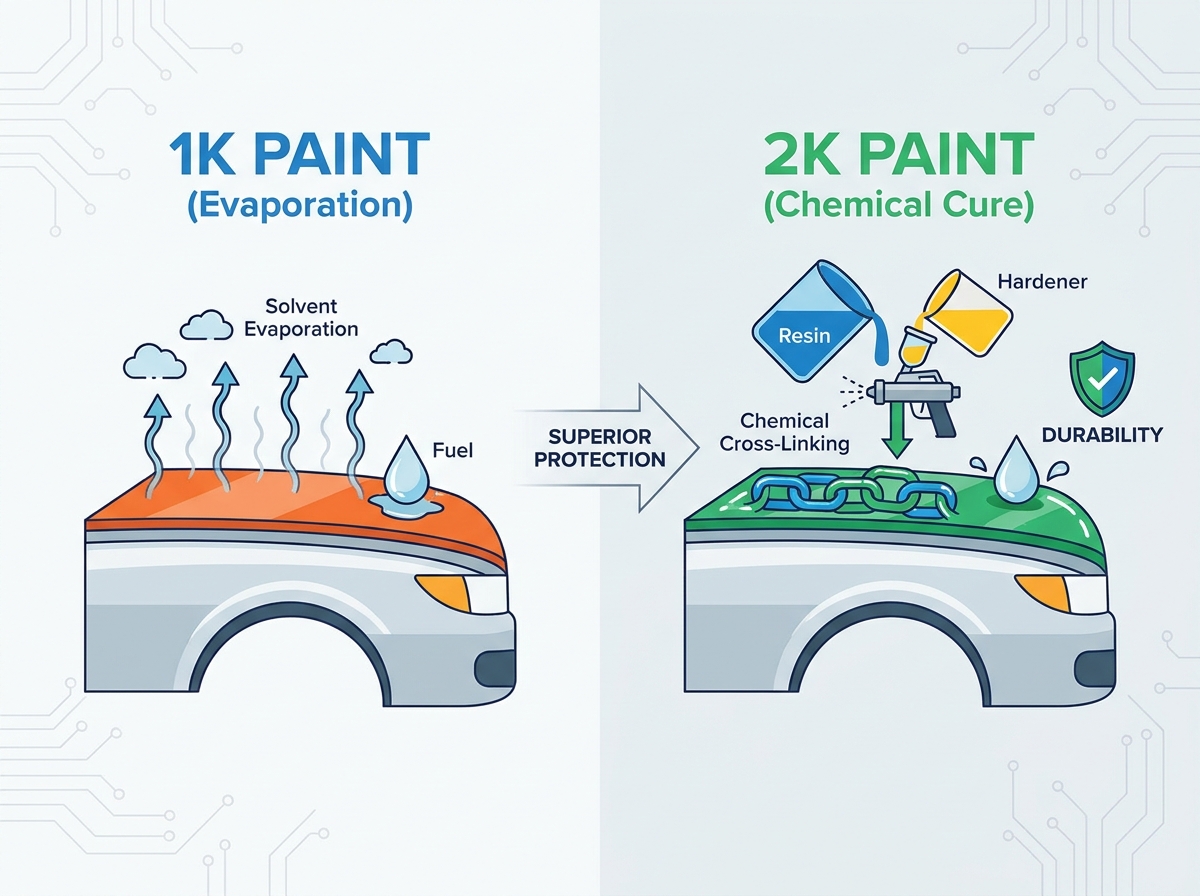
The automotive industry uses the term "2K" to describe a two-component system. You start off holding a base resin in one container. You then introduce an activator or hardener into the mix. This combination sets off a powerful, immediate reaction. You must understand this fundamental concept before pulling the trigger on any spray gun.
One-component paints simply dry. Solvents inside them evaporate into the surrounding air. The remaining solids harden on the panel. This process remains entirely reversible. Strong solvents can remelt a dried 1K finish years later. In contrast, 2K car paint undergoes an irreversible chemical reaction. The activator forces the resin molecules to interlock tightly. This creates a dense, unified chemical grid across your vehicle.
This chemical cure delivers incredible, evidence-backed strength. It resists intense UV degradation over many years. Spilled fuel or harsh degreasers will not melt the surface. It withstands brutal weather cycles easily. Furthermore, the hardened surface shrugs off minor mechanical scratches. Professional detailers can safely wet sand and buff these finishes to a brilliant mirror shine.
A third element often enters this equation. You typically add a reducer or thinner to the activated mixture. This liquid controls the fluid viscosity. It helps the material atomize perfectly as it exits your spray gun. This creates the standard Paint:Hardener:Reducer mixing ratio seen on technical sheets.
- Best Practice: Always stir your base resin thoroughly before adding the activator. Heavy pigments settle at the bottom of the tin during transit.
2. 1K vs. 2K Paint: Making the Right Call for Your Project
Many beginners gravitate toward single-component aerosols because they seem convenient. You shake the can and press the nozzle. However, this convenience comes at a steep cost regarding longevity. We must acknowledge the distinct limitations of single-component products.
Evaluating 1K Paint (The limitations)
- Pros: They are ready to spray straight from the can. You face zero pot-life urgency. They are generally less toxic to handle and significantly cheaper to purchase.
- Cons: They remain highly susceptible to chemical damage. A gasoline spill will literally melt the finish off the panel. They suffer from poor UV stability over time. They completely lack structural hardness.
- Best for: Use them for interior trim pieces. They work well for hidden undercarriage touch-ups. They serve nicely as temporary, quick cosmetic fixes.
Evaluating 2K Paint (The professional standard)
- Pros: You gain excellent high-build capability for filling minor imperfections. They offer maximum gloss retention for show-quality shines. The permanent chemical structure guarantees decades of longevity.
- Cons: You must execute precise mixing ratios. The limited pot life creates a stressful ticking clock. The high toxicity demands serious protective gear. You absolutely require a controlled painting environment.
- Best for: Use this chemistry for all exterior body panels. It remains mandatory for clear coats. Choose it for any restoration requiring a long-term return on investment.
You must assess the final exposure of your painted surface. If the panel faces harsh outdoor elements, you need a robust solution. If the surface contacts chemical solvents, evaporative coatings will fail miserably. Professional restoration shops refuse to use evaporative coatings on exterior panels because the liability is simply too high. Therefore, choosing a two-component system is the only viable, long-term solution.
Application Suitability and Characteristics
| Feature | 1K Paint Systems | 2K Paint Systems |
| Curing Mechanism | Solvent Evaporation | Chemical Cross-Linking |
| Chemical Resistance | Very Low (Melts with fuel) | Excellent (Resists harsh solvents) |
| UV Stability | Poor to Moderate | Maximum Retention |
| Application Complexity | Simple (Ready to spray) | Advanced (Requires precise mixing) |
| Ideal Use Case | Interior trim, temporary fixes | Exterior panels, final clear coats |
![Applying 2K car paint safely in a professional booth]()
3. The Non-Negotiable Safety Protocols (Understanding Isocyanates)
You cannot see or smell the most dangerous element in your spray booth. Hardeners contain highly reactive chemicals called isocyanates. These aggressive compounds seek out moisture in your lungs and skin. Exposure causes severe, permanent respiratory sensitization. Repeated inhalation often triggers debilitating occupational asthma. You must respect this invisible hazard at all times.
Do not rely on basic hardware store masks. Standard N95 particulate filters are entirely insufficient for this chemistry. Even basic carbon masks fail to block these aggressive vapors completely. Professional shops utilize positive-pressure supplied-air respirators. These systems pump fresh, uncontaminated air directly into a sealed hood. For highly ventilated DIY setups, you must use heavily monitored, specific NIOSH-approved organic vapor cartridges. You must replace these filters frequently to ensure ongoing protection.
Isocyanates absorb rapidly through your skin and eyes. You must cover every inch of exposed flesh during the spraying process. We highly specify the need for full Tyvek suits. Tape the wrists and ankles to prevent vapor intrusion. Wear heavy-duty nitrile gloves to protect your hands during mixing. You also need sealed safety goggles to prevent vapor absorption through your tear ducts.
Shop owners face strict regulatory oversight regarding these chemicals. OSHA compliance dictates specific ventilation requirements for spray booths. You must maintain adequate airflow to exhaust hazardous fumes properly. Furthermore, you cannot throw catalyzed waste into a standard dumpster. You must follow strict hazardous waste disposal protocols for any hardened material.
- Common Mistake: Many DIY enthusiasts lift their respirator mask immediately after spraying to inspect their work. The invisible isocyanate vapors remain suspended in the air long after the visible overspray clears. Keep your mask on until you exit the booth entirely.
4. Implementation Realities: Mixing, Pot Life, and Environmental Variables
You fight a ticking clock the moment you stir the mixing cup. Once mixed, the material begins its inevitable chemical cure. Depending on the specific hardener and ambient temperature, pot life ranges from 2 to 8 hours. You must spray the product before it thickens. Letting the mixture cure inside your spray gun is a catastrophic mistake. It will permanently destroy expensive fluid nozzles and internal passages.
You must become obsessed with accurate measurements. Typical mix ratios include 4:1:1 or 2:1 configurations. Always use proper, graduated mixing cups. These cups feature pre-printed ratio scales on the side. You simply find the correct column and pour the liquids to the corresponding lines. Never guess the amounts. You must adhere strictly to the manufacturer's Technical Data Sheet (TDS). Incorrect ratios lead to sticky panels or brittle finishes.
You must adapt your application to your immediate surroundings. Consider these three critical environmental variables before spraying:
- Heat accelerates the chemical reaction. High temperatures drastically shorten your pot life. They also reduce the required flash times between coats. You must work faster in hot conditions.
- Cold stalls the entire curing process. Spraying in a chilly garage prevents the solvents from escaping properly. This inevitably leads to heavy runs and ugly sags across your vertical panels.
- You must choose the right temperature-grade reducer and hardener. Manufacturers offer Fast, Medium, and Slow options. Select the correct speed based on your actual spraying environment to ensure proper flow.
5. Common 2K Application Failures and How to Prevent Them
Even experienced painters encounter application defects. Understanding the root causes helps you prevent them. Here are the most common failures associated with two-component chemistry.
Solvent Pop
This defect looks like tiny pinholes across your clear coat. Imagine boiling water trapped under a sheet of ice. The hot vapor eventually shatters the surface. This perfectly describes solvent pop. It happens when you trap solvents under a cured top layer. The trapped gas forces its way out, popping the surface. Solution: You must respect exact flash times between coats. The TDS dictates these waiting periods perfectly.
Lifting/Wrinkling (The 1K/2K conflict)
This is a nightmare scenario for any builder. Applying hot, aggressive solvents over old, uncured 1K substrates causes severe wrinkling. The new chemicals attack and shrink the weak underlying layers. Solution: You must apply proper barrier coats to isolate the old finish. Alternatively, you should sand the entire panel down to bare metal for guaranteed stability.
Orange Peel
This defect resembles the textured skin of an orange. Incorrect fluid viscosity often causes this frustrating issue. An improper reducer ratio prevents the liquid from flowing flat. Improper gun setup also leads to poor atomization. When air pressure is too low, the fluid exits in large, heavy droplets. Solution: Check your air pressure and fluid delivery settings on a taped test panel first.
Adhesion Failure
Premium coatings cannot compensate for lazy surface preparation. If the surface is dirty, the finish will peel off in large sheets. Solution: You must perform thorough degreasing before spraying. We emphasize the necessity of specific sanding grits. Use P400 to P600 grit paper for base and clear applications. This provides the perfect mechanical scratch profile for proper adhesion.
Conclusion
Two-component chemistry remains unmatched in durability and finish quality. It stands as the definitive choice for serious auto body projects. The depth and clarity it provides simply cannot be replicated by evaporative alternatives.
However, these superior results demand strict adherence to mixing science. You must maintain tight environmental control throughout the process. Most importantly, you must commit to uncompromising safety standards to protect your long-term health.
Your immediate next step is securing proper gear. Source your safety equipment first before buying any liquids. Download the exact Technical Data Sheet for your chosen system and study it. Finally, always perform a test panel spray before committing the product to your actual vehicle.
FAQ
Q: Can you spray 2K clear coat over a 1K base coat?
A: Yes, this is a standard industry practice. Most base coats are 1K to allow for fast drying. You just need to ensure the 1K base has properly flashed. Also, verify the top layer is fully compatible before spraying.
Q: How long does 2K car paint take to cure?
A: Flash time between coats is typically 10–15 minutes. The surface becomes dust-free in a few hours. Full chemical cure usually takes 24 to 48 hours depending on ambient temperature. Only then is it safe for wet sanding and buffing.
Q: Can I save leftover mixed 2K paint?
A: No. Once you introduce the activator to the resin, the chemical cross-linking begins. You cannot stop this reaction. You must let unused mixed paint harden completely. Afterward, dispose of it according to your local hazardous waste regulations.
Q: Do I need a spray gun for 2K paint, or does it come in aerosols?
A: Traditional applications require an air compressor and an HVLP gun. However, modern technology now offers two-component aerosols. They feature a built-in hardener chamber you puncture before use. These cans share the exact same pot-life limits and safety restrictions as gun-sprayed versions.