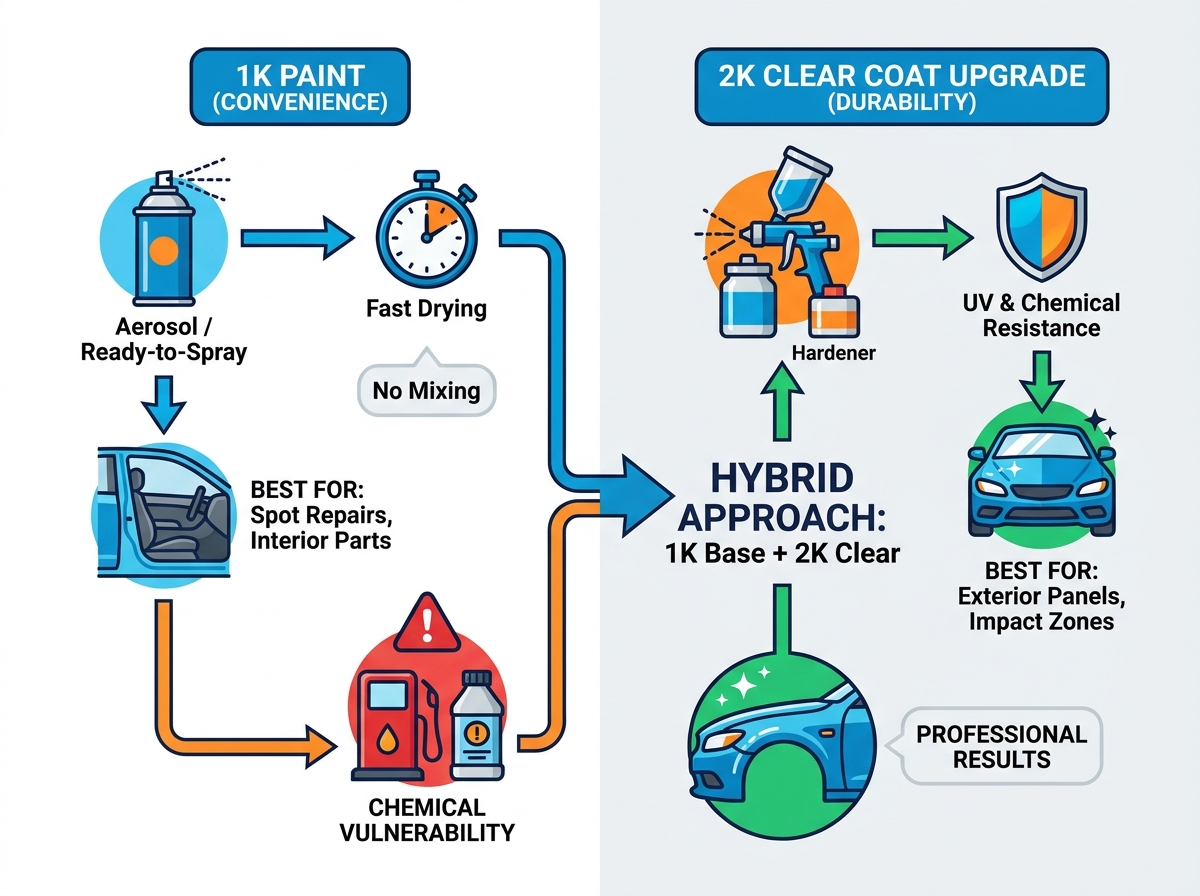
Every automotive enthusiast and DIY repairer faces a primary dilemma. We want the absolute convenience of a ready-to-use product. However, we also demand robust, long-term durability for our vehicle finishes. Striking this delicate balance is rarely simple. You must understand the chemistry behind the products you apply.
This comprehensive guide clearly defines your options. We evaluate single-component paint formats, analyze pricing tiers, and set realistic performance expectations. You will discover the best strategies for automotive touch-ups, accessory parts, and minor panel repairs. Our goal is to outline exactly what these coatings can and cannot do.
We maintain a pragmatic, evidence-based approach throughout this guide. 1K Car Paint is highly effective for many specific applications. It saves time and reduces equipment needs. Yet, misjudging its chemical limitations will undoubtedly result in costly, frustrating rework. You will learn how to navigate these limitations successfully.
Key Takeaways
- Convenience vs. Durability: 1K car paint cures through solvent evaporation (no hardener required), making it easier to use but highly susceptible to harsh chemicals like gasoline or brake fluid.
- Optimal Use Cases: Best suited for interior parts, door jambs, minor bumper scuffs, and basecoat color layers (when sealed with a 2K clear coat).
- Pricing Reality: High-quality color-matched 1K aerosols cost between $25 and $40, while professional ready-to-spray quarts range from $50 to $100+.
- The Clear Coat Caveat: Using a 1K clear coat over a 1K basecoat limits the lifespan of the repair; upgrading to a 2K clear coat over a 1K base is the industry standard for DIY longevity.
Project Framing: When is 1K Car Paint the Right Choice?
Automotive finishes fall into distinct chemical categories. You need to understand these categories to plan your repair. "1K" simply means one component. You do not mix it with a hardener. It dries entirely via air and solvent evaporation. This fundamental trait separates it from 2K paints. The 2K options require a chemical catalyst, such as an activator or hardener. This catalyst forces the paint molecules to cross-link and cure permanently.
Understanding this chemical difference helps you define your success criteria. You should deploy single-component products based on project size. They excel at spot repairs, single exterior panels, mirror caps, and interior trim pieces. These smaller surface areas benefit greatly from straightforward application methods.
Turnaround time also dictates your material choice. Projects requiring fast flash times favor single-component solutions. You avoid the strict pot-life limitations associated with catalyzed paints. Once you mix a 2K product, a rigid countdown begins before it hardens in the cup. Single-component products eliminate this stressful race against the clock.
Equipment constraints further influence the decision. Many users operate without dedicated HVLP spray guns or large-capacity air compressors. High-end 2K systems demand professional spray booths and advanced personal protective equipment. While basic respirators remain absolutely mandatory for any atomized coating, a 1K system significantly lowers the overall barrier to entry.
You must also recognize when to rule out these products entirely. Full vehicle resprays demand catalyzed systems for uniform curing. High-impact areas like front bumpers endure constant road debris. A single-component clear finish will chip rapidly here. Furthermore, avoid using these paints in areas exposed to frequent fuel spills. The regions around your gas cap or inside the engine bay require chemical-resistant 2K cross-linked finishes.
![1K Car Paint Application]()
1K Car Paint Options: Formats and System Types
Manufacturers package these formulas in several distinct formats. Your specific project scope determines the ideal delivery method. DIY enthusiasts often gravitate toward aerosol spray cans. Spot repairs benefit immensely from this format. You experience zero mixing requirements and absolutely no equipment cleanup afterward. Specialized vendors even offer exact OEM color-matching in these pressurized cans.
However, aerosols present distinct drawbacks. You face limited spray pattern control compared to professional guns. The cans hold a lower volume of actual liquid material due to propellant space. Consequently, you pay a higher cost-per-ounce for the sheer convenience of the can.
Professional users often prefer Ready-to-Spray (RTS) pints and quarts. Manufacturers pre-reduce these formulas for immediate use. You pour them directly into your HVLP guns. This method delivers vastly better atomization. It provides superior, even coverage for much larger panels like doors or hoods. The primary downside involves your required setup. You need a reliable compressor, a quality spray gun, and thorough equipment cleaning protocols after spraying.
Beyond delivery formats, you must choose between basecoat and single-stage systems. A 1K basecoat represents the industry standard for delivering rich, accurate color. It dries quickly to a matte finish. You absolutely must top-coat it to achieve gloss and protection. Conversely, 1K single-stage products mix the gloss and color together in one bottle. They spray fast but offer the lowest overall durability. They severely lack UV resistance and fade much quicker in direct sunlight.
1K Paint Formats Comparison
| Format Type | Primary Advantage | Primary Disadvantage | Best Use Case |
| Aerosol Cans | Maximum convenience, no cleanup | Higher cost per ounce, limited fan control | Mirror caps, trim, spot repairs |
| Ready-to-Spray (RTS) | Superior atomization, bulk coverage | Requires compressor and gun cleaning | Full fenders, doors, large panels |
| 1K Basecoat | Excellent color accuracy | Requires a separate clear coat application | High-quality multi-stage OEM repairs |
| 1K Single-Stage | Fast application (color + gloss in one) | Poor UV resistance and low durability | Interior brackets, hidden structural parts |
Evaluating 1K Paint Pricing: Cost Breakdown by Tier
Budgeting for automotive repair requires looking past the sticker price. We can break down 1K Car Paint into two major pricing tiers. Understanding these tiers prevents you from purchasing the wrong grade of material.
The entry-level tier features generic matches. You typically spend between $10 and $20 per aerosol. Quarts generally hover around $30. These capabilities suit very basic needs. You find off-the-shelf universal colors like "Universal Black" or "Bright White" at local auto parts stores. They provide an inexpensive way to cover bare metal quickly.
The risks at this tier are significant. Generic formulas offer a poor color match for aging OEM paint. If your car is ten years old, a generic bright white will clash horribly. Furthermore, these cheaper cans utilize lower pigment density. You end up applying more coats just to achieve basic hiding power. This often negates the initial cost savings entirely.
The second tier consists of professional custom-mixed products. Expect to pay $25 to $40 per aerosol can. RTS quarts in this tier range from $60 to well over $100. These higher-end paints are mixed to your exact OEM paint codes. They use VIN-matched formulas to ensure accuracy. You receive a much higher pigment concentration. Additionally, custom aerosols usually feature superior fan-spray nozzles. These nozzles mimic the wide, flat spray pattern of a real paint gun.
The value proposition here is simple. A higher upfront cost prevents the hidden expense of re-doing a mismatched panel. Spending $35 on a perfect match saves you hours of sanding and repainting later.
You must also factor in hidden implementation costs. You cannot just buy the color layer. You buy into an entire ecosystem. Your project likely requires 1K adhesion promoters for raw plastic. You need high-build primers to fill scratches. You must buy specialized prep wipes to remove wax. Finally, you have to purchase the required clear coat to seal the repair.
The Skeptic’s View: Durability Risks and Limitations
Professional body shops often approach single-component products with a healthy dose of skepticism. We must address these valid concerns transparently. The primary risk revolves around severe chemical vulnerability. Because these formulas cure via evaporation, they do not undergo a permanent chemical change. They remain soluble to aggressive solvents long after they dry.
Imagine completing a beautiful fender repair. A few drops of gasoline spill near the area. Or perhaps you spray brake cleaner nearby. These harsh chemicals will rapidly re-liquefy the surface. They strip the finish right off the panel. This vulnerability makes them unsuitable for engine bays or fuel doors.
UV resistance presents another major limitation. Uncatalyzed clear coats severely lack the robust UV blockers found in premium 2K clears. The sun relentlessly bombards your vehicle's exterior. Over several years, direct sunlight breaks down the weaker polymers. This leads to faster oxidation. Eventually, the top layers begin peeling and flaking away. If you park your car outdoors year-round, you will notice this degradation sooner.
Film build and shrinkage cause hidden headaches for DIYers. Single-component products contain much higher solvent ratios to remain liquid in the can. As you apply the liquid, those solvents must evaporate out. During this outgassing process, the actual paint film shrinks down tightly against the substrate.
If your prep work isn't absolutely flawless, this shrinkage exposes underlying flaws. We call this phenomenon "sand scratch swelling." Weeks after you finish the job, heavy sanding marks magically reappear under the glossy surface. The solvent evaporation pulls the top layers down into the microscopic valleys of your sanding scratches.
Implementation Best Practices to Prevent Paint Failure
You can achieve excellent results by following strict procedural guidelines. The chemistry demands respect. Cutting corners during application guarantees a failing finish. We recommend adhering to these critical industry protocols.
- Surface Preparation is Non-Negotiable: Single-component formulas lack the aggressive chemical "bite" of heavy 2K epoxies. They rely almost entirely on mechanical adhesion. You must create microscopic grooves for the liquid to grip. Scuffing the entire panel with 400 to 600 grit sandpaper is mandatory. Afterward, perform a thorough wax and grease removal. Even a fingerprint can cause the coating to fish-eye and separate.
- Managing Flash Times: Patience dictates your success. Rushing subsequent coats traps heavy solvents under a freshly formed skin. The trapped solvent eventually forces its way out. This leads to solvent pop, which looks like tiny pinhole bubbles. It can also cause severe lifting and wrinkling. You must strictly adhere to the technical data sheet (TDS) wait times between every single coat.
- The Hybrid Approach (1K Base + 2K Clear): We consider this the most highly recommended compromise for serious DIYers. You utilize 1K Car Paint for your basecoat layer. This gives you an exact color match and supreme application convenience. Then, you seal that basecoat with a specialized 2K aerosol clear coat. These modern aerosols contain an internal hardener capsule. You puncture the capsule before spraying. This hybrid method locks in your precise color with a bulletproof, chemical-resistant shell.
Shortlisting Your 1K Paint: The Final Decision Framework
Moving from theory to purchase requires a systematic approach. Do not guess what materials you need. Use this structured decision framework to organize your upcoming project effectively.
- Step 1: Verify the Substrate and Location. Identify the material you plan to spray. Is it a raw plastic bumper? You will need an adhesion promoter first. Is it a bare metal fender? You require an etching primer. Is it an interior dash? You might need a specialized vinyl prep spray. The location dictates your foundation layer.
- Step 2: Locate the Exact Paint Code. Do not rely on visual matching. Do not trust generic marketing names like "Midnight Blue." You must pull the exact OEM code from your vehicle. Check the driver's side door jamb first. Look inside the glove box. Sometimes, manufacturers hide the code under the hood on the firewall. This code ensures your custom mix is perfectly accurate.
- Step 3: Calculate Volume. Buying too little material pauses your project midway. Estimate carefully. One standard aerosol can covers roughly 4 to 5 square feet. A standard front fender generally requires one to two cans of basecoat for full hiding power. Always order an extra can to accommodate mistakes or test panels.
- Step 4: Select the Vendor. Not all paint suppliers deliver equal quality. Prioritize vendors that specialize in custom-mixing. Ensure they provide upgraded fan-spray nozzles on their cans. More importantly, verify they supply transparent technical data sheets (TDS) with your order. You need those sheets to know the exact flash times and coverage limits.
Your ultimate success relies on executing these steps sequentially. Never skip the substrate analysis. Never guess your color code. Proper planning guarantees a smoother application day.
Conclusion
Navigating automotive repairs becomes much simpler when you respect chemical limitations. Single-component products represent a highly efficient, cost-effective solution when deployed within their structural limits. They excel at delivering precise color matches without requiring expensive equipment or complex mixing ratios.
For optimal results, embrace the hybrid application method. Pairing a custom-matched single-component color base with a catalyzed 2K clear coat remains your best strategy. This specific combination offers the perfect balance of DIY convenience and professional-grade longevity.
Take action immediately. Go out to your vehicle and locate your specific paint code right now. Use that verified code to order high-quality, custom-mixed materials from a reputable vendor. Proper preparation remains your strongest tool for achieving a flawless finish.
FAQ
Q: Can you put a 2K clear coat over a 1K base coat?
A: Yes. This is the standard procedure for automotive repairs. Ensure the 1K base is fully flashed (dried) before applying the 2K clear to prevent wrinkling. The strong solvents in the clear coat need a stable, dry foundation.
Q: How long does 1K car paint take to dry?
A: It is generally "dry to the touch" within 15 to 30 minutes and ready for clear coat within 30 to 60 minutes. However, this heavily depends on ambient temperature and shop humidity. Always consult the technical data sheet.
Q: Will 1K paint hold up on a front bumper?
A: As a color layer, yes. However, if sealed with a 1K clear coat, it will chip easily from road debris. A catalyzed 2K clear coat is highly recommended for these high-impact zones to prevent rapid degradation.
Q: Do I need to mix 1K paint with a thinner?
A: Aerosols are pre-mixed. Ready-to-spray (RTS) quarts do not require mixing. But standard basecoat from a paint shop may require reduction with a specific urethane grade reducer based on the manufacturer's TDS.