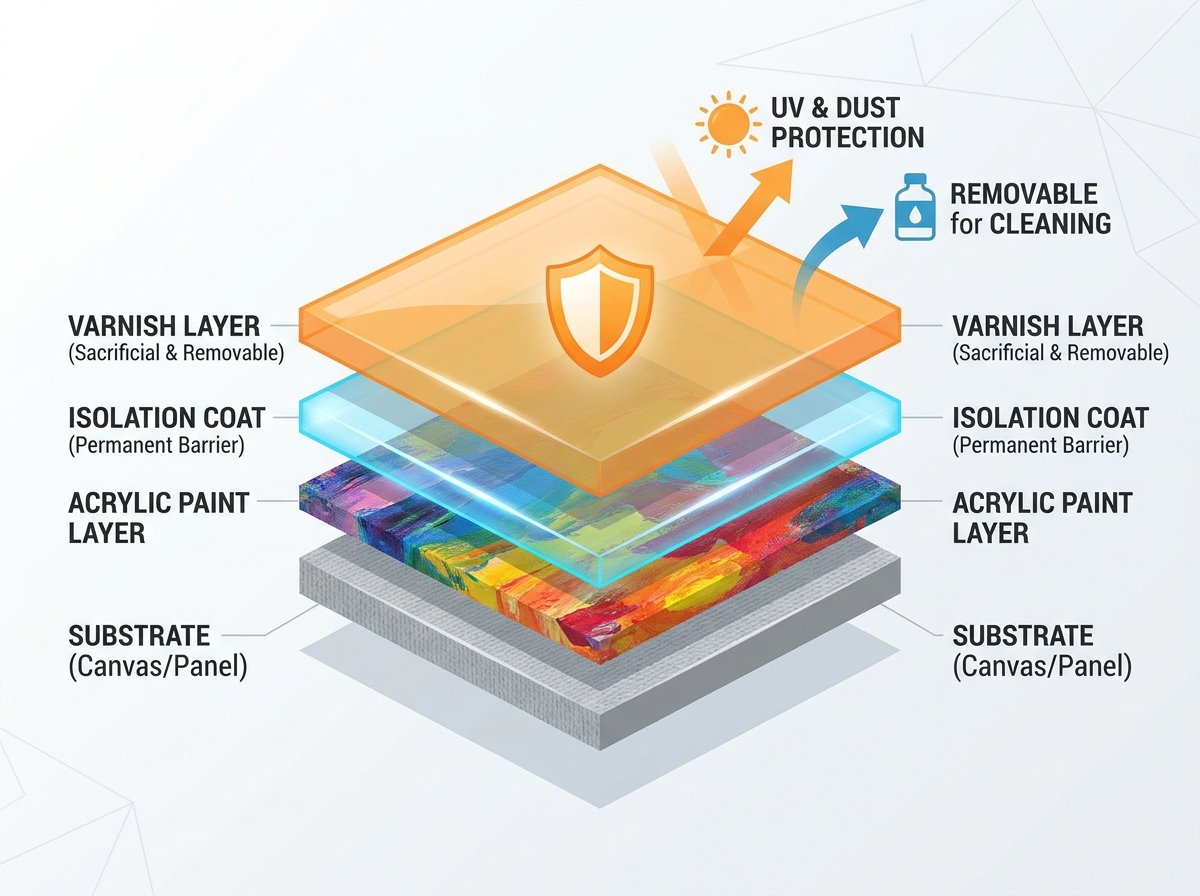
Completing an acrylic project is only the first phase. Preserving the structural integrity and visual fidelity of the piece requires a deliberate sealing strategy. You cannot simply walk away once the pigment dries. Acrylic paint, while remarkably durable, remains highly porous. It is inherently susceptible to dust integration, UV degradation, and mechanical wear over time. Unprotected surfaces quickly lose their initial vibrancy and risk permanent damage from environmental contaminants.
This guide breaks down how to evaluate and select the right Acrylic varnish based on your specific project demands. We will cover strict archival requirements and distinct application environments. You will learn to ensure long-term protection without compromising the original aesthetic. Implementing a proper finishing routine guarantees your work endures for generations.
Key Takeaways
- Protection Metrics: Acrylic varnish serves three primary functions: UV protection, surface sheen equalization, and creating a sacrificial, removable layer against environmental contaminants.
- Formulation Differences: Buyers must choose between water-based polymer varnishes (low odor, easy cleanup) and Mineral Spirit Acrylic (MSA) varnishes (superior leveling, adheres to more substrates).
- Application Modality: Spray varnishes mitigate brush stroke risks on heavily textured pieces, while liquid (brush-on) varnishes offer higher control and thicker single-coat protection.
- Implementation Reality: Applying varnish before the underlying acrylic paint has fully cured (typically 1–3 weeks) traps moisture, leading to irreversible cloudy finishes (blooming).
The Role of Acrylic Varnish: Framing the Protection Problem
Understanding why we seal paintings requires looking closely at the chemical nature of the paint itself. Acrylic binders are fundamentally different from oils or watercolors. They present unique vulnerabilities requiring specific protective measures.
The Porosity Challenge
Unvarnished acrylics attract and constantly hold dust and dirt. Because acrylic binders are thermoplastic, they react significantly to temperature changes. They soften slightly in warmer environments. This microscopic softening allows airborne debris, pet hair, and household smoke to stick permanently to the paint film. Attempting to wash an unvarnished acrylic surface later often forces this dirt deeper into the porous matrix. A high-quality clear coat creates a hard, non-tacky shield across the entire surface.
Surface Equalization
Different color pigments dry with vastly varying levels of natural gloss. For example, Ultramarine Blue often dries with a slight sheen. Conversely, Ivory Black or Raw Umber typically dries completely dead and matte. This inconsistency creates a visually jarring surface. It distracts viewers from the actual composition. Applying a uniform layer of finish standardizes the surface reflection. It pulls the entire visual composition together evenly under gallery lights.
The "Sacrificial Layer" Concept
Professional conservators view topcoats as temporary shields. Professional-grade varnishes are explicitly designed to be removable. If a piece gathers smoke, grime, or atmospheric pollutants over several decades, restorers can strip the varnish safely. They use specific mild solvents to dissolve this top layer. Once removed, they can reapply a fresh coat. This process revitalizes the artwork without ever touching or damaging the original painted composition underneath.
![Applying acrylic varnish to a project surface]()
Solution Categories: Water-Based Polymer vs. Solvent-Based (MSA)
Choosing the correct chemical formulation dictates how you will apply the product and how it performs long-term. The industry divides these solutions into two main categories. Each carries specific handling requirements and distinct advantages.
Water-Based Polymer Varnish
Water-based options dominate the consumer market due to their accessibility and safety profiles. They utilize acrylic polymers suspended in a water emulsion.
- Best for: Indoor projects, home studios with poor ventilation, and standard canvas or heavy watercolor paper substrates.
- Pros: They emit exceptionally low Volatile Organic Compounds (VOCs). You can clean your brushes easily using just mild soap and warm water. Handling them poses minimal toxic risks compared to industrial solvents.
- Cons: The high water content can easily raise the grain on raw wood substrates. Furthermore, future removal requires ammonia-based strippers. Therefore, you must apply a dedicated isolation coat first to ensure safe removal later.
Mineral Spirit Acrylic (MSA) Varnish
MSA products represent the professional standard for maximum durability and visual clarity. They use distinct acrylic resins dissolved in mineral spirits rather than water.
- Best for: Mixed media art, outdoor mural projects, slick non-porous surfaces like metal or glass, and heavily textured impasto paintings.
- Pros: They are brilliantly self-leveling. You will notice exceptional clarity and depth. The solvent base traps far fewer micro-bubbles during application. They offer significantly higher immediate mechanical durability against scratching.
- Cons: MSA formulations demand strong cross-ventilation. You must purchase specialized mineral spirits for thinning the liquid and cleaning your tools. They introduce higher compliance and respiratory safety risks in enclosed studio spaces.
Formulation Comparison Summary
| Feature | Water-Based Polymer | Mineral Spirit Acrylic (MSA) |
| Base Solvent | Water emulsion | Mineral spirits |
| Odor & Safety | Low odor, low VOCs | Strong fumes, requires ventilation |
| Leveling Ability | Moderate (prone to brush strokes) | Excellent (self-levels beautifully) |
| Cleanup Method | Soap and warm water | Commercial mineral spirits |
| Best Substrates | Canvas, paper, primed panels | Mixed media, metal, outdoor surfaces |
Evaluation Dimensions: Selecting the Right Finish and Modality
After selecting your chemical formulation, you must determine the aesthetic finish and the physical delivery method. These choices dramatically alter how viewers interact with the final piece.
Finish Alignment: Gloss, Satin, or Matte
The sheen of your topcoat changes the perceived value and depth of the underlying colors.
Gloss: This finish deepens colors aggressively. It increases the visible contrast between dark shadows and bright highlights. However, gloss creates a highly reflective surface. This reflection frequently causes intense glare under direct gallery track lighting or near sunny windows.
Matte: Matte finishes soften glare completely. They absorb light rather than reflecting it. Manufacturers achieve this by adding microscopic matting agents, usually silica solids. If you apply matte finishes too thickly, these silica particles cluster together. This clustering slightly mutes or "frosts" underlying dark colors, creating an unwanted hazy appearance.
Satin: Satin acts as a hybrid compromise. It offers excellent color saturation while maintaining strictly controlled light reflection. Many artists prefer satin because it mimics the natural, unvarnished look of most standard acrylic paints.
Delivery Method: Spray vs. Brush-on
How you apply the fluid matters just as much as what you apply.
- Spray Aerosol/Pump: Spraying is ideal for fragile surfaces. It works perfectly for mixed media where a physical brush might smear underlying ink, charcoal, or soft pastels. It also coats heavily textured impasto pieces without pooling in the crevices. However, spraying requires extensive masking of edges and demands an outdoor space or a dedicated spray booth.
- Brush-on Liquid: Brushing remains far more economical for large-scale mural projects or massive canvases. It allows for precise edge control without masking tape. Unfortunately, brushing introduces the high risk of leaving visible brush strokes if the liquid fails to level properly before drying.
Implementation Considerations and Application Risks
Even the most expensive Acrylic varnish will fail if applied incorrectly. Understanding the physical limitations of the medium prevents catastrophic, irreversible mistakes during the final project phase.
The Isolation Coat Necessity
Applying a permanent, clear acrylic medium before varnishing protects the actual paint layer underneath. We call this barrier an isolation coat. It consists of a soft, non-removable clear gel or fluid medium. If the top varnish ever needs removal due to smoke damage or yellowing, the conservator uses strong solvents. The isolation coat acts as a tough physical barrier. It prevents the stripping solvent from melting your carefully painted details.
Curing vs. Drying
Beginners often confuse drying with curing. Acrylics feel completely dry to the touch within twenty minutes. However, they take anywhere from one to three weeks to cure fully, depending on application thickness. During this curing window, underlying water and ammonia vapors slowly escape through the surface. Varnishing prematurely traps these escaping gases. This trapped moisture forces the clear coat to turn milky white from the inside out.
Environmental Variables
Your studio environment directly impacts the drying process. High ambient humidity—anything above 70%—frequently causes "blooming." Blooming presents as a milky, cloudy film trapped permanently inside the finish. Similarly, applying topcoats in low temperatures slows evaporation drastically. Always aim to work in a climate-controlled room sitting comfortably around 65 to 75 degrees Fahrenheit.
Agitation Restraints
You must prepare the fluid correctly before application. Shaking a bottle of liquid matte or satin varnish introduces thousands of microscopic air bubbles into the thick resin. Because the fluid dries quickly, these bubbles become trapped. They dry permanently into the finish, leaving a rough, frosted texture. Gentle stirring with a clean palette knife or wooden dowel is mandatory to distribute settled silica matting agents evenly.
Shortlisting Logic: Which Varnish Fits Your Project Next?
Making the final purchasing decision requires matching the product capabilities to your specific workflow. Use the following logic to shortlist your options effectively.
- For Archival Fine Art: Prioritize premium MSA varnishes featuring built-in UVLS (UltraViolet Light Stabilizers). Pair this powerful solvent-based topcoat with a dedicated, permanent isolation coat. This combination guarantees museum-level longevity and safe restoration potential.
- For Crafts and High-Volume Projects: Opt for standard water-based polymer varnishes. They maximize your workflow speed. They offer excellent cost-efficiency per ounce. Furthermore, the ease of sink cleanup keeps high-volume production moving smoothly.
- For Mixed Media or Heavily Textured Surfaces: Default immediately to spray varnishes. Aerosol application strictly prevents soft media smearing. It ensures uniform, thin coverage down into deep canvas crevices where a brush cannot reach without causing fluid pooling.
Next-Step Action: Never apply a new chemical directly to a finished masterpiece. Always test the selected finish on a scrap canvas piece first. Utilize the exact same paint brands, mediums, and substrate materials as your final project. This physical test verifies the expected sheen, reveals any hidden chemical incompatibilities, and allows you to practice your application technique safely.
Conclusion
Choosing the right final clear coat involves a careful calculation of environmental safety, desired visual aesthetic, and long-term project viability. You must match the formulation to your studio capabilities and the specific demands of your artwork.
While skipping this final sealing layer saves a day of work in the short term, the long-term risks remain severe. Unprotected surfaces accumulate irreversible grime and suffer from ultraviolet fading. Specifying the correct formulation—whether an accessible Polymer or a professional MSA—and choosing the proper finish sheen ensures the longevity of your piece. It elevates the visual depth of your pigments and guarantees a truly professional presentation for decades to come.
FAQ
Q: Can I mix gloss and matte acrylic varnishes together?
A: Yes. Mixing liquid gloss and matte varnishes from the exact same brand and formulation line allows you to create a custom satin finish. Ensure thorough, gentle stirring to distribute the silica matting agents evenly without introducing air bubbles.
Q: Why did my acrylic varnish turn cloudy?
A: Cloudiness, known as blooming, occurs when moisture gets trapped beneath or within the clear layer. This typically happens if the underlying paint was not fully cured before sealing, or if you applied the finish in a high-humidity environment.
Q: Do I absolutely need an isolation coat before applying acrylic varnish?
A: For professional and archival work, yes. An isolation coat permanently separates the paint from the removable topcoat. If the surface degrades or gets dirty years later, you can safely strip it with strong solvents without dissolving your actual painting.
Q: How long should I wait before varnishing an acrylic painting?
A: While acrylic paint dries quickly on the surface, it requires significant time to cure completely. For thin paint layers, wait at least one full week. For heavy texture or thick impasto applications, wait three to six weeks before sealing.
Q: Can I use acrylic varnish on oil paintings?
A: No. Acrylic topcoats are not designed for oil paints. Oil paints require months to sometimes years to fully oxidize and cure. Sealing them prematurely with an acrylic polymer will disrupt this necessary oxidation process and can lead to severe cracking or delamination.