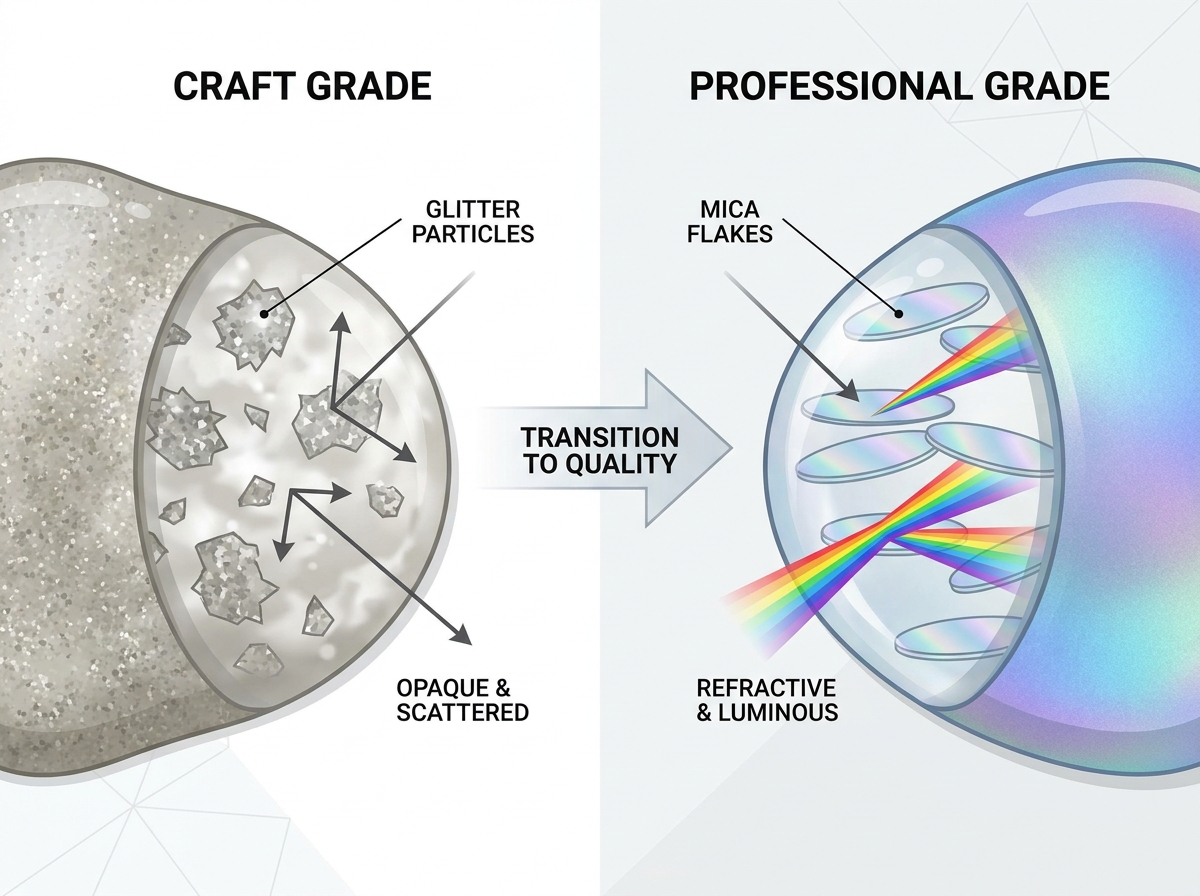
Transitioning from student-grade materials to professional-grade finishes often reveals a glaring issue in many studios. Cheap novelty paints rely on coarse glitter rather than finely milled mica. This shortcut results in a granular, highly unprofessional texture. It can easily ruin your hard work. Achieving a true iridescent finish requires specific binder transparency. It also demands high pigment loads and strict lightfastness standards. Standard reflective craft paints simply cannot replicate this delicate optical depth. You need specialized formulations built for true light refraction to get it right.
This guide evaluates the top professional paint formulations currently on the market. We filter out basic craft-grade options to help fine artists, scale modelers, and fluid pourers make evidence-based purchasing decisions. You will discover exactly which brands deliver unmatched luminosity. You will also learn how to mix them properly. Finally, we explain the core science behind achieving a flawless pearlescent sheen.
Key Takeaways
- Professional acrylic pearl paint relies on titanium dioxide-coated mica flakes, not standard reflective pigments, requiring transparent binders for maximum effect.
- Viscosity matching is critical: heavy body pearls are required for impasto, while high-flow/fluid pearls are mandatory for pour painting and airbrushing.
- Mixing pearl paints with opaque colors (like Titanium White) instantly neutralizes the pearlescent effect; they must be glazed or mixed with transparent pigments.
- Varnishing impacts luminosity; matte varnishes will kill the pearl finish, making gloss or satin isolation coats necessary.
The Evaluation Framework: Separating Professional Pearl from Craft Grades
Understanding paint composition helps you avoid wasting money on inferior products. Craft paints often mask poor quality with cheap fillers. We evaluate professional paints based on strict chemical and physical criteria. This ensures they perform consistently under demanding studio conditions.
Mica Particle Size & Formulation
Manufacturers mill mica differently depending on their target audience. Smaller particles create a smooth, satin-like iridescence. This fine milling mimics genuine natural pearls. Larger flakes create a localized sparkle resembling craft glitter. Professional formulations use microscopic titanium dioxide-coated mica flakes. These flakes refract light uniformly across the painted surface. When you inspect a professional grade, you see a continuous luminous shift. You do not see individual reflective dots.
Binder Transparency & Pigment Load
Binder quality directly dictates luminosity. Professional brands use 100% acrylic polymer emulsions with high clarity. A milky binder obscures the light refraction necessary for the pearl effect. Cheaper brands dilute their binders with opaque fillers to cut costs. This mutes the mica. When selecting a high-quality Acrylic pearl paint, binder transparency is critical. High pigment loads ensure you achieve the desired effect with fewer coats. This preserves your underlying texture.
Lightfastness and Archival Standards
Fine artists must consider the longevity of their work. UV exposure degrades cheap pigments rapidly. We source paints with American Society for Testing and Materials (ASTM) I or II ratings. An ASTM I rating indicates excellent lightfastness. This means the color will remain unchanged for over a century under museum conditions. This archival stability is crucial for commissioned pieces and gallery exhibitions. You cannot risk your pearl effects fading into a dull grey after a few years.
Consistency and Leveling (Scalability)
Rheology refers to how the paint flows and levels. You must match the paint's rheology to your specific production scale. Miniature painters working on Gunpla require highly controlled, self-leveling paints. They need it to dry without obscuring micro-details. High-volume canvas pour painters need fluid dynamics that create cells without breaking down the binder. Impasto artists need a heavy body consistency. The paint must hold stiff peaks and brush marks. Matching consistency to your workflow prevents frustration and ruined artwork.
Table 1: Comparison of Pearl Paint Grades
| Feature | Craft Grade | Professional Grade |
| Mica Type | Large, coarse glitter flakes | Micro-milled, titanium-coated mica |
| Binder Clarity | Milky, contains cheap fillers | 100% clear acrylic polymer emulsion |
| Lightfastness | Poor (fades easily) | ASTM I or II (Archival quality) |
| Finish Texture | Granular and rough | Smooth, continuous iridescence |
![Acrylic pearl paint application process]()
The Top 5 Acrylic Pearl Paints Shortlist
We tested numerous brands to find the best performers across different artistic disciplines. The following five paints represent the highest quality available. We categorized them by their ideal use cases. This helps you choose the right tool for your specific application.
1. Golden Heavy Body Iridescent Pearl (Best for Fine Art & Impasto)
Golden remains the industry standard for professional heavy body acrylics. Their iridescent line delivers exceptional performance for traditional canvas painters.
- Evaluation Dimension: Unmatched pigment load and archival stability. It carries an official ASTM I rating.
- Features-to-Outcomes: The thick, buttery consistency holds aggressive brushstrokes beautifully. It maintains a high-lumen pearl sheen even when applied thickly. This gives impasto painters brilliant textured highlights.
- Risks: It is far too viscous for direct pouring or airbrushing. You must heavily modify it with airbrush mediums or flow improvers to thin it down. This can be time-consuming and tedious.
2. Liquitex Professional Fluid Iridescent (Best for Pour Painting & Fluid Arts)
Fluid artists require paints that flow easily without losing structural integrity. Liquitex engineered this fluid line specifically to maintain pigment density at low viscosities.
- Evaluation Dimension: It offers pre-thinned viscosity with extremely strong binder integrity. The polymer emulsion prevents pigment separation.
- Features-to-Outcomes: Excellent self-leveling properties make it ideal for cellular pouring. It excels in marbling techniques without risking binder breakdown. You get vibrant, flowing pearl effects right out of the bottle.
- Risks: Pearl pigments are heavy. This paint is prone to sinking under heavier opaque pigments during fluid pours. You must calculate paint density carefully to keep the pearl visible on the surface.
3. Vallejo Premium RC & Mecha Color Pearl (Best for Gunpla & Airbrushing)
Scale modelers face unique challenges. They paint onto non-porous plastics and require flawless, thin coats to preserve mechanical panel lines.
- Evaluation Dimension: Vallejo uses micro-milled pigments designed specifically for narrow airbrush nozzles. You can spray this easily through a 0.3mm needle setup.
- Features-to-Outcomes: The polyurethane-acrylic hybrid binder provides high scratch resistance. It offers supreme adherence to primed plastics and resins. The resulting finish mimics scaled-down automotive paint perfectly.
- Risks: It has a very fast drying time. This requires a dedicated retarder medium for hand-brushing. Otherwise, you will leave obvious, unsightly stroke marks on flat armor panels.
4. Pebeo Studio Acrylics High Viscosity Iridescent (Best for High-Volume/Studio Scalability)
Muralists and large-scale studio artists burn through paint rapidly. They need a reliable product that balances cost with professional results.
- Evaluation Dimension: It provides the best cost-to-performance ratio for large-scale applications. It bridges the gap between student economy and professional reliability.
- Features-to-Outcomes: You get affordable bulk sizing with a reliable, consistent pearl shift. It acts as an excellent base for underpainting or large mural foundations. It levels surprisingly well for a high-viscosity product.
- Risks: It possesses a slightly lower pigment density compared to Golden. You will likely require more coats to achieve full, brilliant opacity over dark backgrounds.
5. Amsterdam Standard Series Pearl (Best for Mixed Media & Heavy Texture)
Mixed media artists frequently combine paints with aggressive texture pastes and gels. They need a robust paint that chemically survives these mixtures.
- Evaluation Dimension: It features balanced alkalinity and excellent compatibility with heavy texture pastes. It will not curdle or separate when mixed aggressively.
- Features-to-Outcomes: It cures into a highly durable finish. It retains a distinct color-shift depending on your viewing angle. It remains vibrant even when stretched across pumice or modeling gels.
- Risks: It carries a "Standard" series rating. This means it undergoes slightly less rigorous archival testing than their "Expert" line. It is still excellent, but museum conservationists might prefer Golden.
Implementation Realities: Color Theory and Mixing Risks
Buying a professional paint solves only half the problem. You must understand how to apply and mix it. Iridescent paints behave differently than standard colors. Poor mixing techniques will destroy the very optical effects you paid for. Mastering color theory specifically for micas is essential.
The Opaque Trap
Many artists ruin their pearl paints immediately upon mixing. We call this the opaque trap. Mixing your pearl paint with opaque pigments destroys the light refraction. Common culprits include Cadmium Red, Titanium White, and Carbon Black. These opaque pigments physically block light from reaching the coated mica flakes. The light cannot bounce back to the viewer's eye. The resulting mixture becomes a chalky, muddy pastel color. It loses all shimmer and depth. You must avoid mixing pearls with heavy, chalky pigments entirely.
The Glazing Strategy
To tint a pearl paint successfully, professionals use the glazing strategy. You must mix it exclusively with highly transparent pigments. Excellent choices include Quinacridone Magenta, Phthalocyanine Blue, or Dioxazine Purple. Because these pigments allow light to pass through them, they tint the binder without masking the mica. This retains the pearlescent shift. The tinted light bounces off the mica and returns to the viewer. This creates a brilliant, candy-colored metallic effect. Always check the transparency symbol on your paint tube before mixing.
Underpainting Dependencies
The perceived color of a translucent pearl paint shifts dramatically based on your base coat. Pearl paints are inherently semi-transparent. They rely on the underpainting to establish their final value. Applying pearl over a deep black base yields a vibrant, metallic-like pop. The black absorbs stray light, making the mica refraction stand out sharply. Conversely, applying pearl over a pure white base yields a subtle, bridal shimmer. The white reflects ambient light, creating a delicate and soft iridescence. You should leverage these underpainting dependencies to control your final aesthetic.
Surface Preparation and Curing/Varnishing Constraints
Your surface preparation and finishing steps determine the longevity of your piece. Pearl paints are highly sensitive to environmental factors and topcoats. A flawless application can be ruined by an incorrect varnish. You must follow strict protocols for curing and sealing.
Adhesion Variances
Assess how pearl acrylics grip onto different substrates before you begin. Traditional canvas provides excellent mechanical tooth. Acrylics bond to gessoed canvas effortlessly. However, model making involves smooth, non-porous plastics and resins. Pearl paints can struggle to grip these slippery surfaces. Modelers must use high-quality micro-fill primers. A polyurethane primer creates a microscopic texture. This ensures the acrylic binder anchors firmly, preventing future chipping or peeling during handling.
The "Color Shift" During Drying
You must understand the acrylic drying process to evaluate your work accurately. Acrylic binders are milky white when they are wet. This milkiness temporarily dulls the mica flakes. As the water and retarders evaporate, the binder dries crystal clear. The true intensity of an acrylic pearl paint cannot be accurately judged until it fully cures. This curing process usually takes 24 to 72 hours, depending on film thickness and studio humidity. Do not add extra coats prematurely. Wait for the initial coat to clear up completely.
Varnishing Rules
Varnishing is the most critical step in preserving iridescence. Standard matte varnishes contain matting agents, usually microscopic silica particles. These particles intentionally scatter light to reduce glare. Unfortunately, scattering light completely neutralizes the directional pearl effect. Your vibrant pearl will suddenly look like flat, grey chalk. Professional workflows demand a specific sequence to protect the artwork.
Follow this strict varnishing protocol for pearl finishes:
- Allow the paint to cure completely for at least 72 hours.
- Apply a Gloss isolation coat. The gloss medium dries perfectly clear and enhances light refraction.
- Allow the isolation coat to dry for 24 hours.
- If you find the gloss too reflective, apply a final Satin varnish. The satin finish reduces harsh room glare while still allowing the pearl effect to shine through.
Conclusion: Shortlisting Logic & Next Steps
Choosing the correct product requires matching the paint's chemistry to your specific workflow. There is no single perfect paint for every artist. You must prioritize the features that align with your daily studio practices.
- For Fine Artists: Prioritize archival quality and binder strength. Golden Heavy Body is your safest, most reliable choice for lasting gallery pieces.
- For Modelers/Airbrushers: Prioritize self-leveling, micro-milled options. Vallejo Premium prevents nozzle clogging and adheres beautifully to plastic kits.
- For Pouring Artists: Prioritize fluid dynamics and cost-effective bulk sizing. Liquitex Fluid and Pebeo Studio allow you to scale up your pours without breaking the bank.
Actionable Next Step: Conduct a drawdown test before committing to bulk studio quantities. Purchase a small tube of your shortlisted paint. Take a stiff card and paint one half black and the other half white. Apply a single, even streak of the pearl paint across both halves. Once fully cured, evaluate the true opacity, the shift over dark versus light backgrounds, and the quality of the shimmer. This empirical test ensures the paint meets your exact standards before you start a major project.
FAQ
Q: Can I mix acrylic pearl paint with regular acrylics?
A: Yes, but only with transparent or semi-transparent colors. Mixing them with transparent pigments like Phthalos or Quinacridones creates brilliant custom shifts. Mixing with opaque colors like Titanium White or Cadmiums will dull or completely remove the pearl effect.
Q: What is the difference between metallic and pearl acrylic paint?
A: Metallic paints simulate base metals like gold, silver, or bronze using specific metal powders or heavily tinted mica. Pearl paints use titanium-coated mica to create a semi-transparent, iridescent shimmer. This shimmer subtly changes depending on the light angle, offering a softer effect.
Q: Do I need a special pouring medium for pearl paints?
A: Standard pouring mediums work well, but you must avoid opaque or matte mediums. Always use high-gloss, transparent pouring mediums. This ensures the clear binder is maintained and the mica particles remain fully visible and reflective.
Q: Why does my pearl paint look streaky when brushed?
A: Mica particles physically align with the direction of your brushstrokes, catching light unevenly. To minimize streaking, use a softer synthetic brush. You can also add a fluid retarder to improve leveling, or apply the paint via an airbrush or makeup sponge for perfectly even particle distribution.