Few things feel more frustrating than buying shimmering art supplies only to be disappointed. You brush on your new pearlescent color, expecting brilliance. Instead, the result looks muddy, weak, or completely loses its shimmer once dry.
The truth is, not all pearlescent paints are formulated equally. Differences in mica particle size, binder-to-pigment ratios, and viscosity completely alter the final result. Your choice entirely depends on your medium, whether you paint canvas, miniatures, or fluid art.
This guide provides a pragmatic, application-based framework for choosing exactly what you need. We will help artists, hobbyists, and crafters evaluate the options on the market. Ultimately, you will learn how to select the right Acrylic pearl paint for your specific project requirements.
Key Takeaways
- Application Dictates Viscosity: Miniature painters require finely ground mica in a fluid medium, while canvas artists need heavy-body formulations to retain texture.
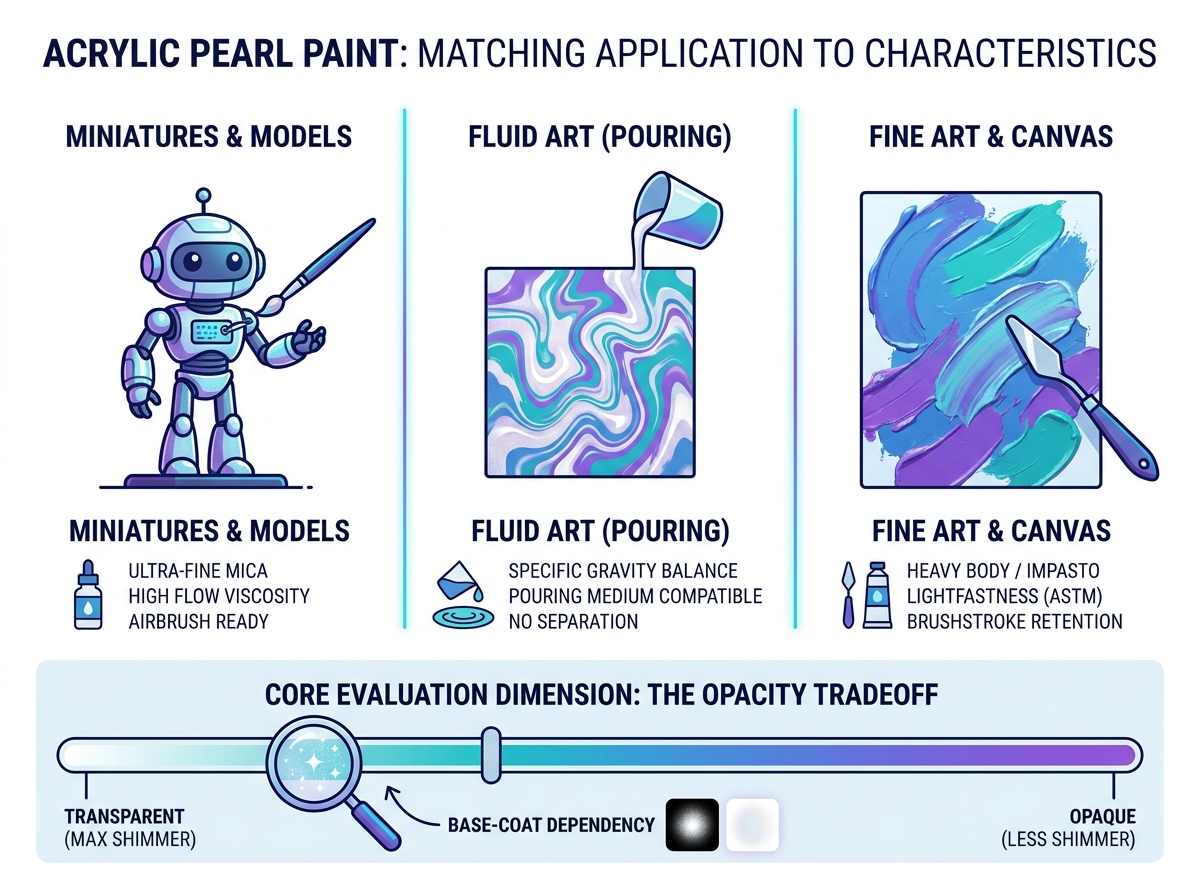
- The Opacity Tradeoff: True pearlescent effects rely on light refraction; therefore, most high-quality pearl acrylics are naturally semi-transparent and require proper base-coating (usually black or white).
- Varnish Sensitivity: The choice of topcoat is as critical as the paint itself—matte varnishes will inherently destroy the pearlescent finish.
- Testing is Mandatory: Always evaluate shimmer, adhesion, and coverage on a primed test piece before applying to a final project.
Matching Paint Characteristics to Your Project (Solution Categories)
Choosing the correct product begins by analyzing your primary application. A formulation designed for thick canvas textures will ruin a delicate miniature. Conversely, a highly fluid medium will frustrate a fine artist looking to build texture. You must match the paint viscosity and particle size to your specific artistic goals.
Miniature and Model Painting
Miniature painters work on tiny scales. They face unique challenges when applying specialty finishes. Standard craft paints often contain large, chunky mica flakes. These large particles easily obscure micro-details like armor panel lines, facial features, or intricate textures.
Criteria: This application requires ultra-fine mica particles. Fine particles create a smooth, scale-appropriate finish. They reflect light evenly without looking like loose glitter scattered across the model.
Requirement: You need a high flow or fluid consistency. The paint must thin down easily. Miniature painters frequently use airbrushes to achieve smooth gradients. If the binder breaks down during thinning, the paint will spit or spiderweb across the model surface. Look for specialized miniature paint ranges designed specifically to hold their binder integrity even when highly diluted.
Pour Painting (Fluid Art)
Fluid art relies entirely on chemistry and gravity. Pour artists mix their colors into pouring mediums. They then layer these mixtures onto a canvas. If the specific gravity of your chosen color is too high, it will sink straight to the bottom of the paint puddle.
Criteria: You must focus on specific gravity and density. Many lower-quality metallic and pearlescent options use heavy metals or dense minerals. These dense particles sink rapidly. You want a formulation balanced for buoyancy, ensuring the shimmering layers remain visible on the surface of your dried piece.
Requirement: The product must mix seamlessly into pouring mediums like silicone or Floetrol. It cannot separate in the cup. It must not lose its luster when stretched across a large canvas. Testing small batches ensures the polymer emulsion plays nicely alongside your chosen pouring medium.
Fine Art and Canvas
Canvas artists often want their brushstrokes to remain visible. They build dimension using palette knives or stiff bristle brushes. A fluid paint simply runs off the canvas or flattens out, destroying the intended texture.
Criteria: This application demands heavy-body or soft-body acrylics. The paint needs enough structural integrity to hold a peak (impasto). The binder must be robust, holding the mica flakes exactly where the artist places them without sagging.
Requirement: Fine art requires strict adherence to lightfastness ratings. Gallery pieces must survive decades of light exposure. Look for products tested against ASTM standards. These standards guarantee the pigments will not fade, yellow, or degrade when exposed to ambient UV light over time.
4 Core Evaluation Dimensions for Acrylic Pearl Paint
Once you narrow down your viscosity needs, you must evaluate the actual quality of the formulation. Not all shimmering mediums perform alike. Use this structured framework to compare different brands and formulations before committing to a large purchase.
Core Evaluation Metrics Matrix
| Dimension | What to Look For | Why It Matters |
| Coverage | Semi-transparent finish over base coats. | True light refraction requires transparency. Opaque pearls often contain chalky fillers. |
| Luster | Uniform glow shifting under different light. | Separates elegant pearlescent finishes from cheap, chunky glitter effects. |
| Curing | Flexible, durable film upon drying. | Prevents flaking and cracking, especially crucial for wearable art or flexible canvas. |
| Color Shift | Retains shimmer when blended lightly. | Ensures you can create custom shades without muddying the reflective particles. |
Coverage and Base-Coat Dependency
Many beginners complain their new purchase looks weak or completely transparent. You should actually view transparency as a feature, not a flaw. True pearlescent effects rely on light traveling through the paint layer, hitting the mica flake, and bouncing back to your eye.
You evaluate opacity by testing it over extreme backgrounds. High-quality pearls often look spectacular over a jet-black base. The dark background absorbs stray light, maximizing the contrast and intensifying the shimmer. Alternatively, applying the color over a pure white base maximizes sheer luminosity, creating an angelic, soft glow.
Luster and Shimmer Intensity
You must evaluate how the paint catches the light. Apply a small amount to a curved surface. Walk around the object. Watch how the light refracts at different viewing angles.
Evaluate the nature of the reflection. Does the shimmer look like a uniform, unbroken glow? This indicates a finely milled, high-quality pearlescent pigment. Or do you see distinct, separated sparkly flecks? This indicates a metallic or glitter additive. Glitter effects often look out of scale on smaller projects and lack professional elegance on fine art pieces.
Binder Quality and Curing
The acrylic polymer emulsion does all the heavy lifting. It glues the mica particles to your surface. You must assess how this binder behaves once the water evaporates.
Does the paint dry to a durable, flexible film? Or does it become brittle and flaky? This distinction proves crucial if you paint flexible surfaces like leather bags, fabric garments, or unmounted canvas. A brittle binder will crack the moment the surface bends. Always bend your test swatch after a 24-hour cure to verify binder elasticity.
Color Shift and Blending Capacity
Artists rarely use colors straight from the tube. You will likely want to blend your shimmering mediums to create custom shades. You must evaluate how the formulation behaves when mixed.
Does it retain its pearl essence? High-quality versions can handle slight tinting. However, poor formulations quickly turn chalky when mixed alongside standard matte acrylics. The dull pigments overwhelm the mica, killing the light refraction completely.
![Acrylic pearl paint formulation and application]()
Implementation Risks: Common Pitfalls to Avoid
Even the highest quality supplies fail if applied incorrectly. Understanding the physical properties of mica flakes helps you avoid disastrous results. Avoid these common implementation failures to guarantee a professional finish.
The "Muddy Mix" Phenomenon
Mixing your shimmering mediums requires extreme caution. Standard acrylics often contain dense, opaque pigments. Titanium white and carbon black represent the worst offenders.
Mixing pearl acrylics with opaque, matte titanium white will physically drown out the mica particles. The dense white pigment acts like a blanket, blocking light from ever reaching the reflective flakes. This mistake results in a flat, chalky, disappointing finish. We advise mixing your shimmering mediums exclusively alongside transparent or semi-transparent colors instead. This preserves the light pathway to the mica.
Brushstroke Streaking
Mica particles are flat, microscopic discs. When you drag a brush across a surface, these discs align themselves parallel to the brush's path.
Erratic, chaotic brushstrokes force the mica flakes to face dozens of different directions. When light hits the surface, it scatters unevenly, creating ugly, streaky finish lines. We strongly warn against scrubbing motions. Recommend unidirectional brushing, where every stroke travels the exact same way. Alternatively, use sponge stippling or an airbrush. These techniques lay the particles down randomly but uniformly, eliminating streak lines entirely.
The Varnish Trap
You finish your masterpiece. You grab your trusted matte varnish to seal it. Within seconds, your beautiful shimmering surface turns dull and lifeless. You just fell into the varnish trap.
Matte and satin varnishes contain microscopic matting agents, usually silica. These agents work by intentionally scattering light, which eliminates glare. Unfortunately, dispersing light instantly kills the pearl effect. The light never reaches the mica properly, and the reflection cannot bounce back. We advise exclusively using high-gloss varnishes over these specific areas to protect the shimmer while providing a durable topcoat.
Shortlisting Logic: Making Your Final Decision
You understand the science. You know the pitfalls. Now you must finalize your purchase. Follow this logical sequence to secure the best materials for your studio setup.
Define the Base Surface
Determine exactly what you are painting. Are you working on porous surfaces like raw canvas, wood, or paper? Or are you painting non-porous surfaces like plastic miniatures, 3D prints, or primed metal?
Porous surfaces absorb binders easily, forgiving weaker paints. Non-porous surfaces demand aggressive adhesion strength. If you paint plastics or metals, prioritize brands known for strong, durable polymer binders. Otherwise, the shimmering layer will simply scratch off during handling.
Buy Open-Stock First
Art supplies require significant financial investment. Never buy massive, multi-color brand sets blindly. You might hate the viscosity. The mica size might ruin your specific application.
We recommend purchasing a single tube or bottle. Buying open-stock allows you to test the physical properties firsthand. Check the flow, test the drying time, and inspect the shimmer intensity. Once the formulation proves itself, you can confidently invest in the larger color bundles.
Conduct a Swatch Test
Never apply an untested medium directly to your final project. Always execute a standardized swatch test to uncover the true nature of your new purchase.
- Prepare a heavy piece of cardstock or watercolor paper.
- Paint one half of the card jet black. Paint the other half pure white. Let these dry completely.
- Apply a single, even stroke of your new shimmering medium horizontally across both the black and white sections.
- Allow the stroke to cure fully.
- Hold the card under direct sunlight or a strong desk lamp.
This simple test instantly verifies the product's opacity. It reveals the true color shift over dark backgrounds. It demonstrates the luminosity over light backgrounds. You now know exactly how the medium behaves before a brush ever touches your masterpiece.
Conclusion
Selecting the ideal shimmering medium does not rely on a single "best" brand. Instead, success depends entirely on aligning the product's physical characteristics with your artistic goals.
Remember these actionable steps for your next project:
- Match the viscosity to your medium. Use fluids for miniatures and heavy bodies for canvas.
- Embrace transparency. Use black or white base coats to manipulate the final intensity.
- Avoid opaque mixing partners. Protect your light refraction by mixing only transparent pigments.
- Never use matte topcoats. Protect your investment by sealing your shimmering layers exclusively beneath gloss varnishes.
By conducting rigorous swatch tests and understanding the physics of light refraction, you eliminate the guesswork. You can now confidently select and apply these beautiful mediums to elevate your creative projects to the next level.
FAQ
Q: Can I make my own acrylic pearl paint?
A: Yes, you can make your own by mixing pure mica powder directly into an acrylic gloss medium or a pouring medium. You must use precise ratios. Too much powder causes clumping and creates a weak binder-to-pigment ratio, leading to flaking. Too little powder results in a weak, invisible shimmer. Always mix small test batches first.
Q: Why does my pearl acrylic paint look transparent?
A: Transparency acts as a vital feature, not a bug. Mica flakes require light to pass through the binder and reflect off their surface. If the binder was completely opaque, the light would block the shimmer entirely. Opaque versions usually contain cheap added fillers that severely dull the final effect.
Q: Can you put acrylic pearl paint in an airbrush?
A: Yes, but you must thin it thoroughly. Use a dedicated airbrush medium rather than just plain water to prevent breaking down the acrylic binder. You also need to use a slightly larger airbrush nozzle, typically 0.4mm or 0.5mm. Smaller nozzles will easily clog due to the physical size of the mica particles.