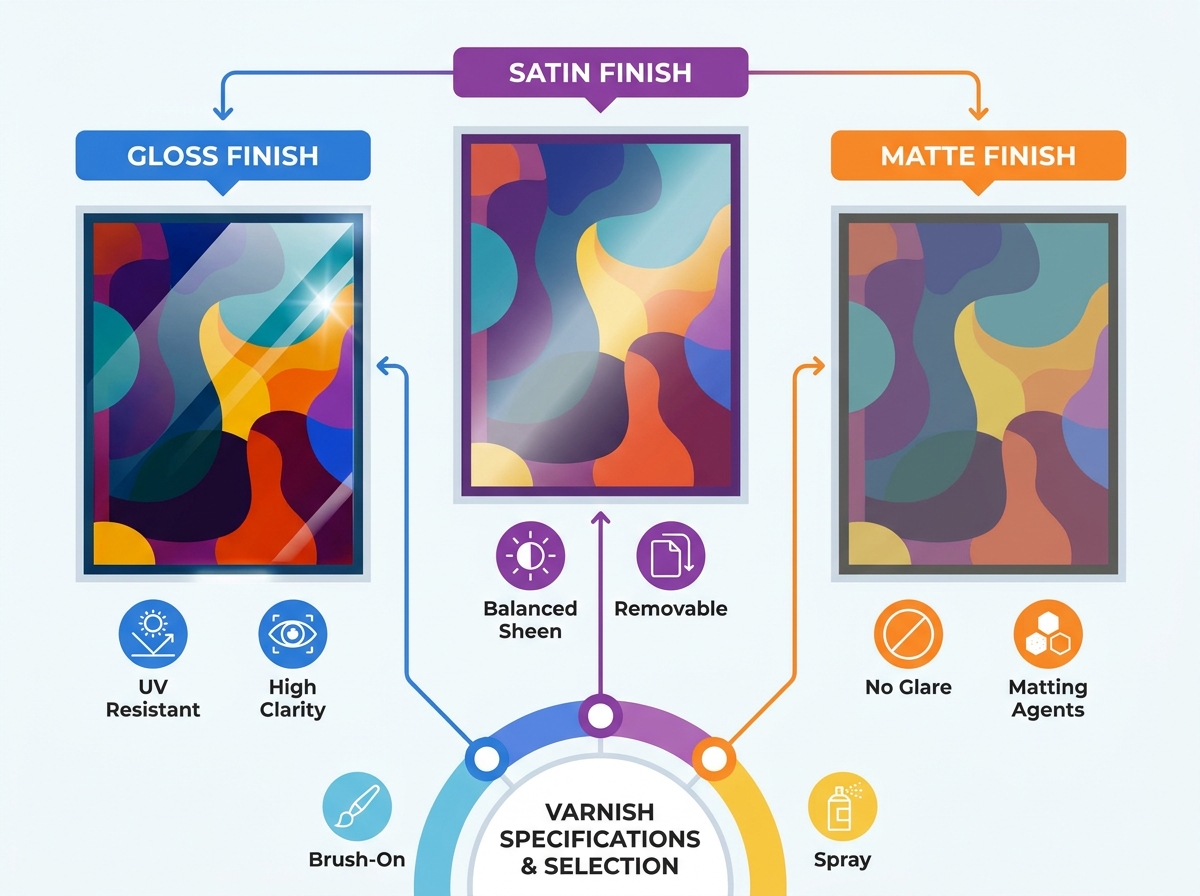
Finishing a painting often feels like crossing a marathon finish line, making the final protective coat a critical victory lap. Applying a high-quality Acrylic varnish serves a dual purpose: unifying the surface sheen and providing a sacrificial, protective layer against severe environmental damage.
However, choosing the wrong protective finish can easily ruin hundreds of hours of hard work. An incorrect application or poor formula choice might cause irreversible clouding, unexpected yellowing, or permanent adhesion directly to the paint underneath. It is devastating to watch a masterpiece degrade because of one final misstep.
In this comprehensive guide, we will explore exactly how to avoid these common disasters. You will learn an objective, spec-driven framework to evaluate and select the right product based on your artwork requirements, application constraints, and strict archival standards. We will cover everything from optical clarity to safe removal.
Key Takeaways
- Finish dictates viewing experience: Gloss enhances color saturation, while matte reduces glare but can lighten dark values. Satin offers a balanced compromise.
- Application method impacts risk: Brush-on formulations offer control but risk brush strokes and bubbling; spray varnishes provide an even coat but require strict ventilation and environmental controls.
- Archival quality requires specific specs: Professional-grade varnishes must be non-yellowing, UV-resistant, and removable for future conservation.
- Curing time is non-negotiable: Applying any varnish before the underlying acrylic paint has fully cured (often 1–3 weeks) traps moisture and causes irreversible clouding.
Framing Your Criteria: Craft vs. Fine Art Requirements
To begin evaluating your options, you must first define the specific scope of your project. We highly recommend distinguishing between casual hobby craft applications and professional fine art preservation. Craft projects often prioritize budget, accessibility, and convenience. You might want a fast-drying sealant simply to protect a painted birdhouse or a decorative wooden tray. In these casual scenarios, strict archival stability naturally takes a back seat to ease of use. You just need a basic shield against dust and minor handling.
However, preserving fine art demands a drastically higher standard. When you spend weeks or months perfecting a gallery canvas, you need a coating explicitly designed for long-term archival stability. Professional products ensure the piece remains vibrant, clear, and undamaged for decades. Using a cheap craft sealant on a fine art piece often leads to cracking, severe yellowing, and sticky surfaces over time.
Another core function to understand is optical unification. Different pigments naturally dry to varying gloss levels based on their chemical composition. For example, ultramarine blue might dry quite matte, while burnt sienna often dries highly glossy. This discrepancy creates frustrating "sunken-in" areas across your painting, disrupting the visual flow. A professional topcoat resolves this inconsistency entirely. It unifies the surface sheen, ensuring light reflects evenly and predictably across the entire composition.
Finally, you must grasp the "sacrificial layer" concept. Museums and professional conservators view topcoats as temporary, expendable shields. They are specifically formulated to take the hit from atmospheric dirt, cigarette smoke, airborne grease, and harmful UV rays. Decades later, a trained conservator can safely remove this damaged layer using dedicated solvents. They can then apply a fresh coat, completely restoring the painting to its original glory without ever harming the underlying paint. This removability defines true archival quality.
![Acrylic Varnish Application]()
Varnish Finishes: Gloss, Satin, or Matte?
The specific finish you choose directly dictates how viewers experience your artwork. Light interacts differently with each formulation, altering the perceived depth and color accuracy of your pigments. Let us explore the three primary options available on the market.
Gloss Varnish
Gloss finishes provide a stunning, glass-like surface. They deepen dark tones significantly, pushing blacks to their absolute darkest values. They also drastically increase overall color saturation, making bright pigments pop with brilliant intensity. If your work relies on rich, deep shadows, gloss is usually the superior choice.
However, gloss has noticeable drawbacks. It creates a highly reflective, mirror-like surface. You must carefully control gallery lighting to avoid blinding glare. If hung near a bright window, the glare can entirely obscure the image beneath it.
Matte Varnish
Matte finishes eliminate glare almost completely. This makes them ideal for brightly lit environments or highly textured pieces where shiny highlights would distract the eye. Viewers can see the artwork clearly from any angle without annoying reflections.
The drawback lies in their actual chemical formulation. Manufacturers add microscopic matting agents, usually silica, to dull the shine. These particles physically scatter light. If you apply matte finishes too heavily, these agents can mute color saturation. They sometimes create a slightly milky or frosty cast over very dark colors, making rich blacks look gray or cloudy.
Satin/Semi-Gloss Varnish
Satin represents the safe, popular middle ground. It cuts the harshest glare from overhead lights while maintaining reasonable color depth and saturation. Many artists prefer satin for its balanced compromise, making it versatile for various lighting scenarios.
As a professional mixing note, you can often blend gloss and matte formulas of the exact same brand. This advanced technique allows you to create custom satin ratios perfectly tailored to your specific project. Always mix thoroughly but gently to avoid creating bubbles.
Varnish Finish Comparison Chart
| Finish Type | Visual Impact | Primary Drawbacks | Best Use Case |
| Gloss | Deepens dark tones; high color saturation. | Highly reflective; prone to severe glare. | High-contrast pieces; dark shadow heavy works. |
| Satin | Balanced saturation; moderate reflection. | May still show minor glare under harsh light. | General fine art; unpredictable gallery lighting. |
| Matte | Zero glare; flat surface appearance. | Can lighten darks; risks a milky/frosty cast. | Highly textured impasto; brightly lit rooms. |
Delivery Systems: Spray vs. Brush-On Acrylic Varnish
Once you select an optical finish, you must choose an application method. Your workspace environment and the physical texture of your painting largely dictate this crucial choice. Both delivery systems have distinct advantages and risks.
Brush-On (Liquid) Varnish
Brush-on formulations offer excellent control over the application process. They generally contain no harmful aerosol propellants, making them significantly safer to use indoors due to fewer Volatile Organic Compounds (VOCs). You also achieve much thicker individual coats, meaning you often need fewer layers to achieve full protection.
When evaluating liquid options, look closely at their self-leveling properties and overall viscosity. A premium formula will smooth itself out as it dries, flattening minor imperfections. You should always use a dedicated, high-quality synthetic brush designed specifically for finishing coats.
However, brush-on methods carry distinct implementation risks. You face a high likelihood of retaining visible brush strokes if the environment is too warm, causing rapid drying. Furthermore, if you over-work the liquid by brushing back and forth excessively, you will easily trap tiny air bubbles. These bubbles dry permanently into the film, ruining the clarity.
Spray (Aerosol) Varnish
Spray options deliver a uniform, incredibly thin coat. This method eliminates brush stroke risks entirely. Spraying is especially ideal for highly textured impasto pieces or fragile mixed media where a physical brush might catch or disturb the surface.
When assessing aerosols, check the nozzle quality carefully. Cheaper cans often suffer from sudden spatter, shooting large droplets onto your pristine canvas. Also, evaluate the formulation type, such as standard water-based resin versus MSA (Mineral Spirit Acrylic). MSA formulas often provide superior leveling but require different handling.
The main risks involve safety and strict environmental dependency. Aerosols produce highly toxic fumes. You must wear a proper dual-cartridge respirator and apply them outdoors or inside a specialized, heavily ventilated spray booth. Choosing to apply a sprayed Acrylic varnish also means you become highly sensitive to ambient humidity and temperature fluctuations.
Core Technical Specifications to Evaluate
Archival quality is not just a marketing term; it requires specific, measurable technical specifications. You must read labels carefully to protect high-value work effectively. Pay attention to the following core metrics before purchasing.
- UV Resistance (Lightfastness protection): Assess whether the formula explicitly includes UV Light Stabilizers (HALS - Hindered Amine Light Stabilizers). These advanced chemical additives protect fugitive pigments from fading under prolonged exposure to sunlight or harsh fluorescent gallery lights.
- Non-Yellowing Formulation: Always verify you are buying a 100% acrylic polymer or specific synthetic resins like MSA. Traditional natural resin varnishes (like Damar) will inevitably amber and crack over time. Modern synthetic materials are rigorously tested and proven not to yellow over decades of display.
- Removability (Archival Standard): Determine if the protective layer can be safely removed later. Conservators use specific mild solvents, like mineral spirits or specialized ammonia solutions, to dissolve the top layer without stripping the underlying paint. Note: Water-based polymer formulas require a dedicated, non-removable isolation coat beneath them for safe removal.
- Toxicity and VOC Levels: Compare water-based polymer options against solvent-based MSA formulas. Water-based formulas generate lower odor and are generally safer for indoor studio use. Solvent-based MSA formulas offer superior clarity and leveling, but they require strict safety protocols, respirators, and proper hazardous waste disposal during application.
Implementation Risks: Varnishing Dos and Don'ts
Even the highest-rated product will fail spectacularly if applied incorrectly. Understanding the chemical behavior of these topcoats is essential. Follow these best practices to avoid the most common studio mistakes.
Don't Apply Too Soon
You must understand the critical difference between paint being "dry to the touch" and "fully cured." Acrylic paint might feel completely dry in twenty minutes, but it still holds significant moisture deep inside the polymer matrix. Complete chemical cross-linking and evaporation take weeks.
We strongly emphasize extending your waiting times. If you apply a dense seal too early, you trap escaping moisture beneath the film. This trapped moisture is the primary cause of blooming—a phenomenon where the surface develops ugly, cloudy, or white opaque spots. Always wait at least one to three weeks before varnishing, depending on paint thickness.
Do Use an Isolation Coat
An isolation coat is a clear, non-removable acrylic barrier layer. You apply it directly over your fully cured painting. Once this barrier is dry, you then apply your removable topcoat. This crucial step ensures future conservators can strip the dirty topcoat with solvents without ever touching or dissolving your actual painted pigments. Skipping this step puts the original artwork at immense risk during future restoration.
Don't Shake Matte/Satin Liquid Varnishes
Shaking a bottle vigorously seems like a logical way to mix settled ingredients. However, doing so introduces thousands of microscopic air bubbles into the thick liquid. These bubbles will transfer directly to your canvas and dry as tiny white specks. Instead, matting agents should be gently but thoroughly stirred. Use a clean wooden stick or palette knife to disperse the settled silica evenly across the bottom without creating any surface foam.
Do Test Environmental Conditions
Never apply spray aerosols in high humidity. Anything above 70% humidity introduces ambient moisture directly into the aerosol mist as it travels through the air. This causes instant clouding upon impact. Extreme temperatures, both freezing and sweltering, also ruin the chemical curing process. Always test your environment first. If the air feels damp or heavy, delay the application until the weather improves.
Conclusion
Selecting the correct final coating involves far more than simply grabbing the cheapest bottle off the shelf. You must employ a logical, spec-driven decision framework. First, match the finish to your anticipated lighting environment and the contrast needs of your composition. Next, choose the application method based on your available workspace ventilation and the physical texture of the canvas. Finally, prioritize UV protection and strict removability specifications to ensure high-value work remains pristine for generations.
Before moving forward, we recommend taking a few practical next steps. Purchase small quantities of your shortlisted options. Test them extensively on scrap canvas painted with your usual pigments. Observe how they dry, how they affect dark values, and how they handle in your specific studio environment. Never commit a new product to a finished, high-value piece without a comprehensive trial run. Patience in the testing phase guarantees perfection in the final presentation.
FAQ
Q: How do I know if my acrylic paint has hardened enough for varnish?
A: While acrylic dries to the touch in minutes, complete cross-linking (curing) takes 1 to 3 weeks depending on thickness, humidity, and temperature. A cold surface often indicates moisture is still evaporating. Wait the full curing time to avoid trapping moisture.
Q: Can I use acrylic varnish on other mediums like oil or watercolor?
A: Some solvent-based acrylic varnishes (MSA) are cross-compatible with oils, but water-based acrylic varnishes will bead up on oil paintings and potentially reactivate watercolors. Always check manufacturer spec sheets before mixing mediums.
Q: Why did my acrylic varnish turn cloudy and how do I fix it?
A: Clouding (blooming) is usually caused by trapped moisture (varnishing too soon or high humidity) or built-up matting agents. If a removable varnish was used over an isolation coat, it can be stripped with appropriate solvents and carefully reapplied.