Capturing a luminous, iridescent finish in art and craft projects remains a unique challenge for many creators. You want a brilliant shimmer, but you cannot afford to compromise paint adhesion, color clarity, or archival quality. Artists often struggle to maintain this delicate balance. They frequently encounter dull, muddy finishes instead of radiant surfaces.
This is where Acrylic pearl paint steps in to solve the problem. We define this specialized medium as an acrylic polymer emulsion infused with mica platelets. Manufacturers coat these platelets in titanium dioxide or similar metal oxides rather than using traditional solid pigments. This specific formulation gives the medium its unique optical properties.
This article provides a practical, evidence-based framework for evaluating, selecting, and implementing these specialized paints in your workflow. We will help you avoid common pitfalls like over-mixing or losing your desired shimmer. Read on to master the techniques you need for flawless, radiant results in every project.
Key Takeaways
- Formulation matters: Pearl acrylics rely on light refraction through mica; opacity and pigment load dictate whether they act as a standalone color or a glazing medium.
- Application dictates grade: Fluid art (acrylic pouring) requires different binder densities than brushwork to prevent the heavier mica particles from sinking.
- Varnish compatibility is critical: Applying matte or satin varnishes over pearlescent paint will actively cancel out the refractive shimmer; gloss finishes are mandatory for preservation.
- Cost vs. Yield: Professional-grade pearl paints carry a higher upfront cost but require significantly less volume to achieve the desired effect compared to craft-grade alternatives.
How Acrylic Pearl Paint Differs from Standard Metallics
Understanding the optical differences between pearlescent and metallic mediums transforms how you plan your artwork. Many artists mistakenly treat them as interchangeable products. They serve entirely different visual purposes.
The Mechanism of Shimmer
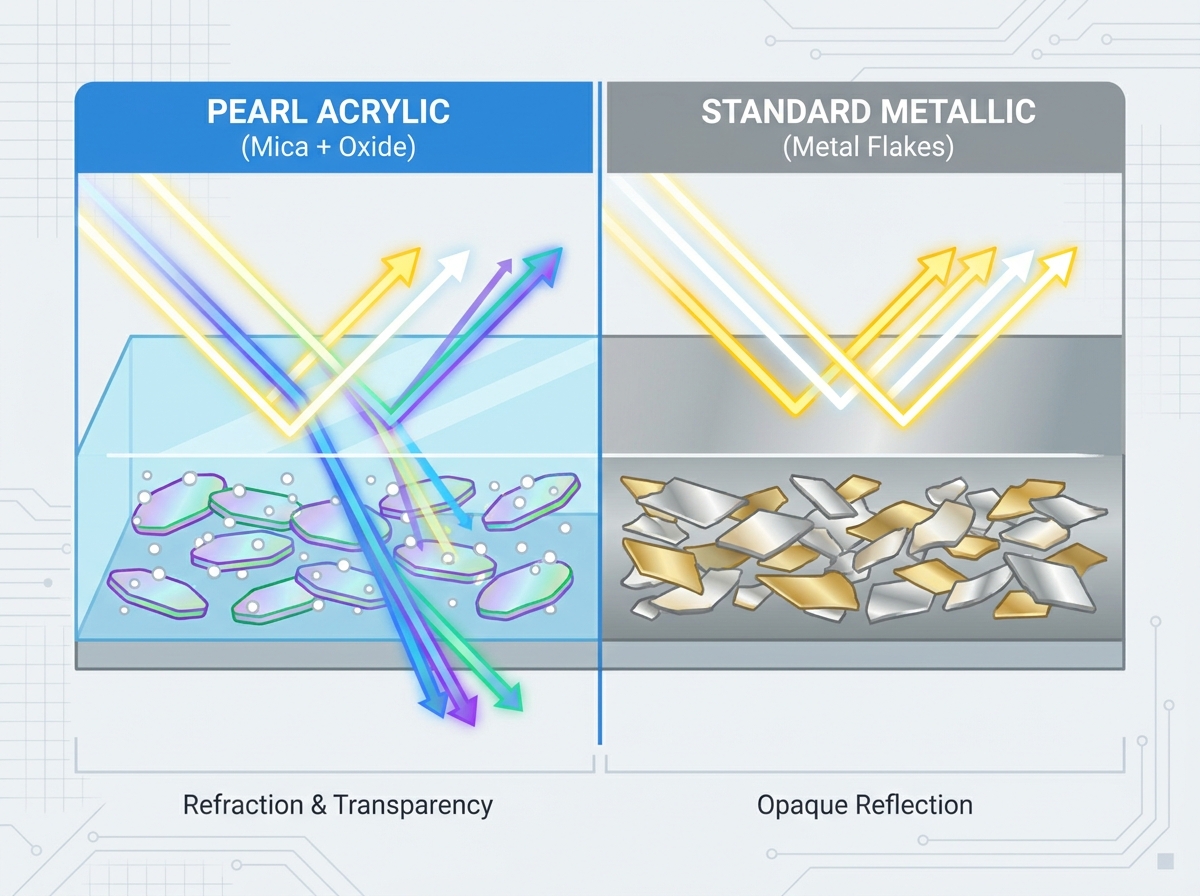
Standard metallics use actual microscopic metal flakes. Manufacturers grind aluminum, bronze, or copper into fine powders. These metal particles remain completely opaque. They act like tiny mirrors suspended in the polymer binder. Light hits the metal and bounces directly back to the viewer. This creates a solid, uniform shine.
Pearlescent paints operate on a different physical principle. They use transparent or translucent mica flakes. Chemists coat these delicate flakes in highly reflective metal oxides. Because the core particle remains translucent, light penetrates the outer oxide layer, travels through the mica, and refracts. This complex journey creates a soft, glowing shimmer rather than a harsh metallic flash. The refracted light mimics the natural luminescence of a seashell or a natural pearl.
Transparency and Layering
Because they rely on translucent mica, pearl paints inherently possess higher transparency. They do not block out the layers beneath them. This specific characteristic makes them highly effective for glazing over dark bases. You can apply a thin coat over dried black paint to create a rich, deep luminosity.
Conversely, they prove less effective for single-coat solid coverage. If you try to paint a white canvas using only a pearlescent shade, the result often looks weak or streaky. You must build them up in multiple thin layers or use them as a topcoat over a solid, opaque foundation.
Interference vs. Pearl
Artists frequently confuse pearl paints and interference paints. We must clarify this distinction to ensure predictable results. Pearl paint reflects a consistent white or silver light regardless of your viewing angle. The shimmer remains stable as you walk past the canvas.
Interference paints contain mica coated at very specific, varying thicknesses. This precise coating causes light waves to interfere with one another. Consequently, interference paints shift color based on the angle of light and the background color. They might appear blue when viewed straight on, but shift to violet or gold when viewed from the side. Pearl formulations do not exhibit this color-shifting behavior.
![Acrylic Pearl Paint]()
Evaluation Criteria for Choosing a Pearl Acrylic
Selecting the right product requires more than looking at the color swatch on the tube. You must evaluate the chemical makeup and physical behavior of the medium. We use three primary criteria to determine if a paint will perform well in a specific project.
Pigment Load and Mica Quality
First, assess the concentration of mica per tube or bottle. Professional formulations feature a remarkably high pigment load. High-load paints maintain their intense shimmer even when you heavily dilute them. You can mix them into pouring mediums or thin them down for airbrushing without losing the pearlescent effect.
You must also evaluate the micron size of the mica particles. Manufacturers use different grinding processes. Finer particles create a smooth, continuous satin pearl finish. They blend seamlessly into the binder. Larger particles create a distinct, glitter-like sparkle. They catch the light aggressively but may leave a slightly textured surface on your canvas.
Binder Consistency and Viscosity
The acrylic polymer binder determines how the paint moves and holds its shape. You must match the viscosity to your specific application method.
- Heavy Body: These paints possess a thick, buttery consistency. They remain the best choice for impasto techniques and palette knife work. They excel at retaining distinct brush strokes and creating physical texture.
- Fluid or High Flow: These formulations behave like heavy cream or ink. You absolutely need them for acrylic pouring, airbrushing, or creating smooth glazes. They level out naturally without leaving unwanted brush textures behind.
Lightfastness and Archival Integrity
Professional artists demand archival longevity. You should always verify the ASTM (American Society for Testing and Materials) ratings on the packaging. Mica itself is generally stable and does not degrade easily. However, pure white pearl is rarely the only option.
Many brands offer tinted versions, such as "Pearl Blue" or "Pearl Magenta." The dyes or additional pigments mixed into these tinted formulations must be evaluated independently. Some cheaper dyes prove highly fugitive. They will fade rapidly under sustained UV exposure, leaving behind a dull, colorless shimmer. Always look for ASTM I or ASTM II ratings to guarantee lightfastness.
Evaluating Top Brand Categories (Shortlisting Logic)
The art supply market categorizes acrylics into distinct tiers. Each tier balances cost against chemical quality. Understanding these categories helps you allocate your budget effectively.
Acrylic Pearl Paint Categories Comparison
| Grade Category | Pros | Cons | Best Applications |
| Professional / Artist Grade | Maximum pigment load, archival certifications, consistent viscosity, zero binder separation. | High cost per ounce, requires careful medium mixing. | Fine art, commissioned pieces, professional fluid art requiring strict archival longevity. |
| Student / Studio Grade | Excellent cost-to-performance ratio, reliable consistency for mixing in large batches. | Moderate transparency; often requires multiple coats for solid brushwork. | Large-scale acrylic pours, practice canvases, intermediate artists experimenting with scale. |
| Craft Grade | Highly affordable, widely available in hobby shops, pre-thinned for immediate use. | Low pigment load, prone to UV fading, weaker polymer binders that may crack if applied thickly. | Hobby crafts, paper stenciling, and non-archival decorative home projects. |
When you choose a Professional or Artist Grade paint (such as Golden or Liquitex), you pay for stringent quality control. The binder will not separate from the mica during storage. While the upfront cost per ounce appears high, the intense concentration means you use far less product per painting.
Student or Studio Grade options (like Amsterdam) bridge the gap. They utilize high-quality binders but reduce the overall concentration of expensive mica. You receive a reliable product perfect for large-scale applications where professional grade would prove prohibitively expensive.
Craft Grade paints (such as DecoArt or Arteza) utilize weaker polymer chains. They serve a vital purpose in the hobby space. However, if you apply them too thickly, the weak binder shrinks during evaporation and cracks. Avoid them for gallery-bound artwork.
Implementation Risks: Common Application Pitfalls
Even the highest quality mediums fail if you apply them incorrectly. The unique physical properties of mica require specific handling techniques. Avoid these common implementation risks.
The "Sinking" Effect in Fluid Art
Mica particles carry a higher specific gravity than many standard organic pigments. They are physically heavier. In the world of fluid art and acrylic pouring, this weight causes significant problems. If you mix a pouring medium that is too thin, the pearl paint will sink beneath opaque colors like titanium white or carbon black. Once the piece dries, the opaque layers completely hide the pearlescent effect. You must maintain a dense enough medium to keep the mica suspended near the surface.
Over-mixing and Muddying
Color mixing requires a delicate touch. Aggressively stirring pearlescent paints into heavy, opaque colors destroys the shimmer. When you over-mix, you effectively coat the translucent mica platelets in solid, opaque pigment. The light can no longer reach the reflective metal oxide layer. Instead of a luminous custom color, you end up with a flat, muddy pastel. Always fold colors together gently, or apply the pearl as a separate, subsequent layer.
Binder Breakdown
Many beginners attempt to turn heavy-body acrylics into fluid paints by adding excessive amounts of tap water. This practice destroys the chemical structure of the paint. If you thin heavy-body pearl paints with more than 30% water, you break down the acrylic polymer matrix.
To prevent binder breakdown, follow these numbered steps:
- Measure your heavy-body paint into a mixing cup first.
- Add a dedicated acrylic thinning medium or airbrush medium, not water.
- Stir slowly to prevent air bubbles from trapping against the mica flakes.
- If you must use water, limit it to a maximum of 10% of the total mixture volume.
- Test the adhesion on a scrap surface before applying it to your final piece.
Failing to respect the binder ratio results in poor adhesion. The paint will dry into a powdery film and flake off the canvas weeks later.
Best Practices for Mixing, Pouring, and Finishing
Flawless execution requires optimizing your entire workflow. You must prepare the surface correctly, mix the mediums scientifically, and seal the final piece properly.
Optimizing the Base Coat
Pearl paints look their absolute best when applied over a dark, fully cured base layer. We recommend using black, deep navy, or rich maroon. The dark background color absorbs scattered ambient light. It prevents the light from bouncing randomly inside the canvas texture. This intense contrast forces the mica platelets to reflect light directly back to the viewer. It maximizes the pearlescent effect, making the colors pop with sudden brilliance.
Pouring Medium Ratios
Never rely on water to create pouring mixtures. You must use a dedicated pouring medium like Liquitex Pouring Medium or Floetrol. These specialized mediums maintain the structural integrity of the acrylic polymer while keeping the heavy mica particles in suspension.
A standard starting ratio is one part pearl paint to two or three parts pouring medium. You must adjust this ratio based on the brand's inherent viscosity. Professional high-flow acrylics require less medium. Heavy-body acrylics require more medium and vigorous, yet careful, integration.
Selecting the Right Varnish
Your choice of varnish dictates the final success of the project. You can ruin weeks of careful painting in five minutes with the wrong topcoat.
Never use matte or satin varnish over pearlescent paint. Manufacturers create matte varnishes by adding microscopic matting agents, usually silica. These silica particles scatter light in all directions to kill glare. Unfortunately, they also scatter the light trying to reach your mica flakes. A matte varnish will instantly dull the shimmer and turn your pearl paint into a flat, chalky gray.
You must always finish these pieces with a high-gloss polymer varnish or a clear epoxy resin coat. A high-gloss finish amplifies the refractive index of the mica. It acts like a magnifying glass, deepening the colors and intensifying the iridescent glow.
Conclusion
Mastering this unique medium requires a clear decision-making framework. You must choose the grade of your paint based on your project's archival needs and your specific application method. Professional grades serve fine art brushwork best, while studio grades excel in large-scale fluid dynamics.
Remember that successful implementation relies just as much on proper medium ratios and gloss varnishing as it does on the quality of the paint itself. You cannot achieve a brilliant finish if you break down the binder with water or suffocate the mica under a matte topcoat.
We strongly recommend testing a small swatch of your chosen paint with your preferred pouring medium and gloss varnish. Evaluate this test piece before committing to a large-scale project. By controlling your variables, you guarantee a luminous, professional result every time.
FAQ
Q: Can I make my own acrylic pearl paint using mica powder?
A: Yes. Mixing dry cosmetic-grade or epoxy-grade mica powder into a transparent gloss acrylic gel or pouring medium creates a custom pearl paint. However, controlling the consistency and ensuring thorough dispersion requires rigorous mixing. You must stir slowly to avoid trapping air bubbles, which can cloud the final dried polymer.
Q: Why did my pearl paint lose its shine after drying?
A: Acrylics experience a "color shift" as they dry because the milky-white polymer binder turns clear. If the shine is permanently lost, it is usually due to mixing the pearl with an opaque color. Alternatively, you may have used a matte medium or matte varnish that scattered the light and dulled the finish.
Q: Does acrylic pearl paint work on canvas, wood, and glass?
A: Yes, provided you prep the surface properly. Canvas and wood require standard acrylic gesso to prevent the binder from soaking into the porous fibers. Glass requires a specialized adhesion promoter or a glass-and-tile medium. Without this promoter, the acrylic film will easily peel off the non-porous glass surface once dry.